Breville BCS600XL Manual do usuário
- Categoria
- Liquidificadores
- Tipo
- Manual do usuário

Cordless Hand Blender
Model BCS600XL
Model BCS600XL Issue 1/06 Packaging Code:AM / CN
Breville is a registered trademark of Breville Pty. Ltd.
Breville Customer Service Center
US Customers
✉
PO Box 47170
Gardena
CA 90247
☎
Service Center: 1 (866) BREVILLE
Email [email protected]
www.breville.com
Canada Customers
✉
Anglo Canadian
2555, de l’Aviation
Pointe-Claire (Montréal) Québec
H9P 2Z2
☎
Service Center: 1 (866) BREVILLE
Fax (514) 683-5554
Email [email protected]
www.breville.com
© Copyright. Breville Pty.Ltd. 2006
Due to continual improvements in design or otherwise, the product you
purchase may differ slightly from the one illustrated in this booklet.
FILENAME: BR8252 BCS600XL Book_FRE_SPN amend
Breville > BR8252 > BCS600XL_FRN_SPN > GW
A5 Instruction Booklet PMS 8403 and BLACK
ARTWORK SCALE 100%
PRINTED HERE AT 100%
Ver. 01
28/11/06
3:30PM
BLACK
PMS 8403
BR8252 BCS600XL_Book_FRE_SPN 13/12/06 4:28 PM Page a1

Congratulations
on the purchase of your new Breville Cordless Hand Blender
Contents
Page
Breville recommends safety first 4
Know your Breville Cordless Hand Blender 6
Operating your Breville Cordless Hand Blender 7
Cordless Hand Blender (stick blender) 10
Cordless Hand Blender (smoothie attachment) 12
Cordless Hand Blender (chopper bowl attachment) 13
Care, cleaning and storage 14
Warranty 15
Recipes 16
2
BR8252 BCS600XL_Book_FRE_SPN 13/12/06 4:28 PM Page 2

5
Breville recommends safety first
We at Breville are very safety conscious.We design and manufacture consumer products with the safety of you,
our valued customer, foremost in mind.In addition, we ask that you exercise a degree of care when using any
electrical appliance and adhere to the following precautions:
IMPORTANT SAFEGUARDS FOR BREVILLE
CORDLESS HAND BLENDER
• Read all instructions before operating and save for
future reference.
• Remove any packaging material and promotional
labels before using the Cordless Hand Blender for
the first time.
• Do not place the Cordless Hand Blender (including
the charging base) near the edge of a bench or
table during operation or charging. Ensure the
surface is level, clean and free of water, flour, etc.
• The Cordless Hand Blender (including the charging
base) should be placed on a bench or wall-
mounted away from sinks or hot surfaces.
• Do not place the Cordless Hand Blender (including
the charging base) on or near a hot gas or electric
burner, or where it could touch a heated oven.
• Always make sure the Cordless Hand
Blender is completely and properly
assembled before operating.
• Always ensure the blending shaft and smoothie
attachment are securely fitted onto the motor
body before operating.
• Do not attempt to operate the Cordless Hand
Blender by any method other than those described
in this booklet.
• Do not unplug the charger plug from the power
outlet by pulling on the cord. Never carry the
charger plug or charging base by the cord. Grasp
and pull the charger plug to disconnect from the
power outlet. Do not drag or pull cord around sharp
edges or corners.
• If using the Cordless Hand Blender as a stick
blender to blend hot food in a saucepan, remove
the saucepan from the heat source and ensure the
liquid is not boiling.Allow hot food to cool slightly
before blending.The Cordless Hand Blender should
be kept away from any heat source.
• Handle the Cordless Hand Blender and attachments
with care – remember the blades on the blending
shaft are very sharp and should be kept out of
reach of children.
• Do not use attachments other than those provided
with the Cordless Hand Blender.
• Do not operate the appliance continuously for
more than 60 seconds.Allow the motor to rest
for 1 minute between each use.
• Never mix dry, thick or heavy mixtures for more
than 15 seconds. Stop the operation and stir the
ingredients before continuing.Allow the motor to
rest for 1 minute between each use.
• Do not leave the Cordless Hand Blender unattended
when in use.
• Always ensure the Cordless Hand Blender charging
base is turned off at the power outlet before
attempting to move, clean or store it.
• Always ensure the Cordless Hand Blender is not
switched on before attempting to attach any of the
accessories.The Cordless Hand Blender safety
system ensures the appliance will not operate
unless the Power button and Speed button
are pressed simultaneously.
• If food becomes lodged around the processing
blade or in the blade guard, switch off the Cordless
Hand Blender and remove the blending shaft from
the motor body. Use a spatula to dislodge the food.
Do not use fingers as the blades are sharp.The
Cordless Hand Blender safety system ensures the
appliance will not operate unless the Power button
and Speed button are pressed simultaneously.
• Do not remove the Cordless Hand Blender from
ingredients during operation. Ensure the appliance
is switched off and the motor has completely
stopped before removing - to avoid contact with
moving blade, smoothie attachment or splashing of
hot liquids.
• To protect against electric shock do not immerse
the motor body, charger plug,power cord or
charging base in water or any other liquid.
• Use only the charger plug and charging base
supplied with this appliance to recharge the
Cordless Hand Blender.
• Do not attempt to use the charger plug and
charging base with any other product
• Never handle the charger plug, charging base
or Cordless Hand Blender with wet hands.
• Keep the appliance clean.Follow the cleaning
instructions provided in this book.
4
Important safeguards for all electrical appliances
• Do not allow the charging base cord to hang over
the edge of the table or counter, touch hot surfaces
or become knotted.
• This appliance is not intended for use by young
children or infirm persons unless they are
adequately supervised by a responsible person to
ensure that they can use the appliance safely.
• Young children should be supervised to ensure
that they do not play with the appliance.
• It is recommended to regularly inspect the
appliance. Do not use the appliance if charger,
power supply cord, charging base or appliance
becomes damaged in any way.Return the entire
appliance to the nearest authorised Breville Service
Center for examination and/or repair.
• Any maintenance, other than cleaning, should be
performed at an authorised Breville Service Center.
• This appliance is for household use only. Do not
use this appliance for anything other than its
intended use. Do not use in moving vehicles or
boats. Do not use outdoors.
SAVE THESE INSTRUCTIONS
BR8252 BCS600XL_Book_FRE_SPN 13/12/06 4:28 PM Page 4

Operating your Breville Cordless Hand Blender
7
Before first use
Remove any packaging material and promotional
labels. Remove the blending shaft from the blister
pack and wash the blending shaft in warm soapy
water. Rinse and dry thoroughly.Ensure no water
remains inside the blending shaft to avoid water
ingressing into the motor body when re-attached.
Disassemble mixing jug, storage lid and smoothie
attachment and wash in warm soapy water, rinse and
dry thoroughly.Ensure no water remains inside the
smoothie attachment to avoid water ingressing into
the motor body when re-attached.
Dishwashing is not recommended for any part of the
Breville Cordless Hand Blender.
Unlike stick blenders which are plugged into the
power outlet for operation, the Cordless Hand Blender
is safe for use in and around the sink and stove.
However, care should be taken not to immerse the
motor body in water or any other liquid. If using the
Cordless Hand Blender as a stick blender to blend hot
food in a saucepan, remove the saucepan from the
heat source and ensure the liquid is not boiling.
Allow hot food to cool slightly before blending.The
Cordless Hand Blender should be kept away from
any heat source.
The charging base is running at a safe, low
voltage, but it will be damaged if immersed in
water.The charging base should always be
positioned in a clean,dry place well away from
water or other liquids.
Charging the battery before first use:
The battery in the motor body of the Cordless Hand
Blender is shipped either completely discharged of
power or with a small amount of charge.The battery
will require approximately 5 hours to fully recharge
from completely flat.The battery will require at least
2 hours recharging before it can be used effectively.
Subsequent recharging should take a shorter period
of time depending on the length of time the charging
base has been switched off.
The Cordless Hand Blender motor body has been
designed to be placed on the charging base and left
on charge at all times when not in use.The Cordless
Hand Blender motor body is fitted with a special
protective electronic circuit to prevent overcharging.
Unlike other rechargeable battery technologies, your
high quality Nickel Metal Hydride (Ni-MH) cells have a
high capacity and long life.They do not need to be
completely discharged before recharging.
All rechargeable batteries lose storage capacity
over time. If the Cordless Hand Blender battery
appears to deteriorate so that the operation time is
diminished, return the unit to a Breville Service
Center for battery replacement.
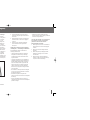
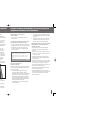
Know your Breville Cordless Hand Blender
6
Long lasting 12V battery
2 speed push button control
light press for low speed, firm press for high speed
Safety system
ensures the Cordless Hand Blender will not operate unless the Power
button and Speed button are pressed simultaneously
Portable cordless operation
Detachable shaft for easy cleaning
Stainless steel ice-crushing blades
34 floz (1 liter) capacity mixing jug with storage lid
ideal for blending, measuring and storing a variety
of foods.The jug lid also doubles as a non-slip
base, as it fits both the top and bottom of the jug.
Patented smoothie attachment
for whipping and aerating
360° charging base
with cord storage
Optional wall
mount included
THE CORDLESS HAND BLENDER IS A VERSATILE APPLIANCE
THE CORDLESS HAND BLENDER MOTOR BODY CAN BE ATTACHED TO:
• THE STAINLESS STEEL BLENDING SHAFT – FOR USE AS A STICK BLENDER
• THE SMOOTHIE ATTACHMENT – FOR USE AS A STICK MIXER
• THE CHOPPER BOWL WITH CHOPPING BLADE AND LID - FOR USE AS A MINI CHOPPER
OR FOOD PROCESSOR.
Charge light
indicates when the Cordless
Hand Blender is charging
(red) or fully charged
(green)
Chopping bowl
for use as a mini chopper or food processor.
Item not shown.
BR8252 BCS600XL_Book_FRE_SPN 13/12/06 4:28 PM Page 6

9
The Cordless Hand Blender is equipped with a
compact charger plug. It takes up a minimum of
space around the power cord.When plugged in, the
charger plug will always remain warm, even after the
charge light changes from red to green.
The charging base stores the excess cord from the
charging base. Simply pull the excessive cord until
the desired length is achieved.The excess cord
can be wrapped inside the cavity under the
charging base.
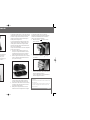
If you choose to wall mount the charging base,
please follow these steps:
1. Select a convenient position within 3ft (1m) of
an electrical outlet. If the charging base is to be
mounted closer to an outlet,wrap any excess
cord in the cavity under the charging base.
2. Place the wall mount against the wall in the
desired position to mark the drill holes for the
screws (see Fig.3).
3. Drill a 0.2inch (5mm) diameter hole through the
center of each drill hole mark. Push a plastic wall
anchor into each drilled hole.
4. Insert a screw into each drilled hole and turn
until the screw heads are 0.1inch (3mm) above
the wall surface.
5. Slide the wall mount onto the screws and attach
the charging base to the wall mount.
The Cordless Hand Blender features a unique safety
switch to ensure the appliance does not operate
accidentally.To activate the Cordless Hand Blender,
follow the sequence below:
1. Depress the Power button for 1 second
2. Continue holding the Power button , then
depress the Speed button .
3. To select the desired speed:
I. For low speed, lightly depress the Speed button
II. For high speed, firmly depress the Speed button
Ensure the Power button is depressed first.
Ensure the Power button has been depressed
for 1 second before depressing the Speed button.
Ensure both the Power button and Speed
button are depressed together.
Note
Operating your Breville Cordless Hand Blender
continued
Overload and low voltage protection
The Cordless Hand Blender is fitted with an
automatic cut-out that will operate if the appliance is
overloaded.This is to protect the motor and battery
from excessive heat build up.The cut-out is only
momentary,and the appliance can then be
re-started. If this automatic cut-out occurs,reduce
the volume of food being mixed and process in
smaller amounts.
The Cordless Hand Blender is fitted with a second
automatic cut-out that operates when the battery
starts to become flat.This protection is necessary
because applying high loads to flat rechargeable cells
reduces their life. If your appliance cuts out without
being overloaded, return it to the charging base until
sufficiently recharged.
Operating time
The actual operating time of the appliance will
vary significantly with the types and quantities of
food being processed, but is typically over 10
minutes with a new,fully charged battery under
average conditions.
Battery charging procedures
1. Plug the charger plug attached to the charging
base into a 110/120 volt power outlet.
2. Place the Cordless Hand Blender motor body into
the charging base, making sure that it firmly sits
in the charging base and the red charging light
illuminates.Your Cordless Hand Blender will
begin charging.When the battery is fully charged
the charging light will change to green.
3. To maintain the charge in the motor body, keep
the charging base plugged into a standard power
outlet.When charging, the charger plug may be
warm to the touch – this is normal. It is
impossible to overcharge the battery because the
Cordless Hand Blender is designed with
overcharge protection circuitry.
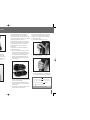
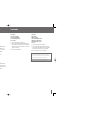
Charging base
The charging base recharges the Cordless Hand
Blender and stores the smoothie attachment and
excess cord from the charging base (see Fig.1).The
charging base can be mounted on the wall (see Fig.
2) or placed on a horizontal surface such as a
counter or shelf.
8
Fig 1
Fig 2
Fig 3
X
X
Mark drill holes here
Fig 4
Fig 5
BR8252 BCS600XL_Book_FRE_SPN 13/12/06 4:28 PM Page 8

11
3. Work through the ingredients in the mixing jug
with a gentle raising and lowering motion.
4. Switch off the Cordless Hand Blender motor by
releasing the Power and Speed buttons.
5. Ensure the motor has completely stopped before
lifting the Cordless Hand Blender out of the
mixing jug.
Recommendations when using
the Cordless Hand Blender as a
stick blender:
• The Cordless Hand Blender blends foods and
liquids rapidly, therefore it is easy to over-process.
Remember when using the Cordless Hand Blender,
check food throughout operation.
• The stainless steel blending shaft on the Cordless
Hand Blender allows for hot food to be processed
directly in the saucepan.This makes blending
soups and sauces very easy.For safety reasons,
remove the saucepan away from the heat source
before processing. Ensure the Cordless Hand
Blender is kept away from any heat source.
• When pureeing and blending, cut food into
uniform sizes.This will ensure smooth and
consistent results.
• Warm all liquids to be added to soups and purees,
this will ensure even blending.
• Use the storage lid of the mixing jug as a non slip
base for the jug during blending.This will keep the
jug stable.
• Do not operate the appliance continuously for more
than 60 seconds.Allow the motor to rest for 1
minute between each use.
If food becomes lodged around the
blade or in the blade guard, follow
these safety instructions:
1. Switch the Cordless Hand Blender off by
releasing the Power and Speed buttons.
2. Remove the blending shaft from the motor body.
3. Use a spatula to carefully dislodge the food.Do
not use fingers as the blades are sharp.
4. After the food has been removed and the blades
are clear,re-attach the blending shaft to the
motor body and continue blending.
Cordless Hand Blender (stick blender)
To detach the stainless steel
blending shaft
Ensure the Cordless Hand Blender is switched off by
keeping hands clear of the Power button and Speed
button. Unscrew the blending shaft from the
motor body in a clockwise direction (See Fig.1).
To attach the stainless steel
blending shaft
Hold the shaft with the blades down, and align the
top end of the blending shaft with the corresponding
end of the motor body. Screw the shaft into the motor
body in an anti-clockwise direction.
To use the stick blender
Ensure the stick blender is completely and properly
assembled as detailed on the left.
1. Place food to be processed into the mixing jug
provided (or a sufficiently large mixing bowl or
saucepan).The mixing jug provided should only
be filled up to the 'LIQUID MAX' mark when
blending liquids.
2. Place the blending shaft as deeply as possible
into the mixing jug and depress the Power button
(top button) to turn the Cordless Hand Blender
on.While still depressing the Power button,
depress the Speed button (bottom button).To
select the desired speed, the Speed button
should be lightly depressed for low speed and
firmly depressed for high speed. Both the Power
button and the Speed button must be depressed
simultaneously for the required duration of
operation (see Fig. 2).
10
THE STAINLESS STEEL ICE CRUSHING BLADES ON THE BLENDING SHAFT ARE
EXTREMELY SHARP, KEEP FINGERS AWAY FROM THE BLADES AT ALL TIMES.
Fig 1
Power button
Speed button
Fig 2
BR8252 BCS600XL_Book_FRE_SPN 13/12/06 4:28 PM Page 10

13
Cordless Hand Blender (smoothie attachment)
To detach the smoothie attachment
Ensure the Cordless Hand Blender is switched off by
keeping hands clear of the Power button and Speed
button. Unscrew the smoothie attachment from the
motor body in a clockwise direction (See Fig.1).
To attach the smoothie attachment
Hold the shaft with aerating blades down, and align
the top end of the smoothie attachment with the
corresponding end of the motor body. Screw the shaft
into the motor body in an anti-clockwise direction.
To use the smoothie attachment
Ensure the smoothie attachment is completely and
properly assembled as detailed on the left.
1. Place food to be processed into the mixing jug
provided (or a sufficiently large mixing bowl or
saucepan).The mixing jug provided should only
be filled up to the 'LIQUID MAX' mark when
blending liquids.
2. Place the smoothie attachment as deeply as
possible into the mixing jug and depress the
Power button (top button) to turn the Cordless
Hand Blender on.While still depressing the
Power button, depress the Speed button (bottom
button).To select the desired speed, the Speed
button should be lightly depressed for low speed
and firmly depressed for high speed. Both the
Power button and the Speed button must be
depressed simultaneously for the required
duration of operation (see Fig. 2).
3. Work through the ingredients in the mixing jug
with a gentle raising and lowering motion.
4. Switch off the Cordless Hand Blender by
releasing the Power and Speed buttons.
5. Ensure the motor has completely stopped before
lifting the Cordless Hand Blender out of the
mixing jug.
12
Fig 1
Power button
Speed button
Fig 2
Cordless Hand Blender (chopper bowl attachment)
To detach the chopper attachment
• Remove the motor from the chopper lid.
To attach the chopping blade, chopping
bowl and lid
• Place the food inside the chopper bowl. Do not
exceed the max marking.
• Ensure the chopper bowl lid is dry with no water
left inside before reattaching.
Always place the chopping blade on its pivot
pin on the bottom of the bowl before placing
any contents into the bowl. Do not lift the
blade before the complete chopping operation
is finished.
Note
To use the chopper bowl
Ensure the chopper is completely and properly
assembled as detailed on this page.
1. Depress the Power button (top button) to turn the
Cordless on.While depressing the Power button,
depress the Speed button (bottom button).
To select the desired speed, the Speed
button should be lightly depressed for low
speed and firmly depressed for high speed.
Both the Power button and the Speed button
must be depressed simultaneously for the
required duration of operation.
2. When processing has finished,switch off the
Cordless Hand Blender by releasing the Power
and Speed buttons.
3. Ensure the motor has completely stopped before
removing the motor body from the lid of the
chopper bowl.
Recommendations when using
the Cordless Hand Blender with
Chopper Bowl
• Do not operate your Cordless Hand Blender when
the chopper bowl is empty.
• During processing, hold the motor body with one
hand and chopper bowl and lid with the other.
• When processing, cut food into uniform sizes to
ensure quicker, even and more consistent results.
• DO NOT process hard foods such as coffee, cereals
or chocolate in lumps and this may result in
damage to the blade.
• DO NOT process boiling or hot foods in the
chopper bowl.
• NEVER remove the blade from the bowl before the
processing is completed.
• The Cordless Hand Blender blends food and liquids
rapidly, therefore it is easy to over process.
Remember to check food throughout the operation.
BR8252 BCS600XL_Book_FRE_SPN 13/12/06 4:28 PM Page 12

Warranty
1514
Care, cleaning and storage
Dishwashing is not recommended for
any part of the Cordless Hand Blender.
Under no circumstances should the blending shaft be
placed in the dishwasher.The caustic chemicals used
in dishwashers will inevitably damage the seals and
bearings that support the rotating shafts reducing
their service life.
For longest life,we recommend hand washing the
exposed blade portion of the blending shaft in the
sink, avoiding water entering the inside of the shaft
as much as possible.
While the transparent mixing jug is made from high
quality plastic material, (which will not be damaged
by the occasional dishwashing on the top shelf only),
for maximum life we recommend hand washing in
the sink.
Stick blender
Ensure the Cordless Hand Blender is switched off by
releasing the Power and Speed buttons. Remove the
stainless steel blending shaft from the motor body.
The stainless steel blending shaft should be hand
washed in hot soapy water, rinsed and dried
thoroughly after each use. Do not use abrasive
cleaners or steel wool.
QUICK WASH: Between each processing task,with
the motor body attached and turned off, place the
stainless steel blending shaft into a jug of water then
depress the low speed for 5 seconds.This will
remove any food on the blade and blending shaft and
allow you to continue onto the next processing task.
Blades are extremely sharp, handle with care.
Motor body
Ensure the Cordless Hand Blender is switched off by
releasing the Power and Speed buttons. Remove the
motor body from the stainless steel blending shaft.
To remove any food residue from the motor body,
wipe with a damp cloth only. Do not use abrasive
cleaners or steel wool.Never immerse the motor
body in water or any other liquid.
Smoothie attachment
Ensure the Cordless Hand Blender is switched off by
releasing the Power and Speed buttons. Remove the
smoothie attachment from the motor body.
The smoothie attachment should be hand washed in
hot soapy water, rinsed and dried thoroughly after
each use. Do not use abrasive cleaners or steel wool.
Chopper bowl
Ensure the Cordless Hand Blender is switched off by
releasing the On and Speed buttons. Remove the
motor body from the chopper bowl lid, then remove
the lid and chopper blade from the chopper bowl.
The chopper bowl, chopper bowl lid and chopping
blade should be hand washed in hot soapy water,
rinsed and dried thoroughly after each use. Do not
use abrasive cleaners or steel wool.
Storage
Ensure the Cordless Hand Blender is switched off by
releasing the Power and Speed buttons. Ensure the
appliance is clean and completely dry.
For safety reasons,it is recommended to store the
motor body and smoothie attachment on the charging
base, and keep the blending shaft in a convenient
cupboard or drawer.
One year limited warranty
Breville®* warrants this Breville® appliance against
defects that are due to faulty material or
workmanship for a period of (1) year from the date
cited on the original purchase receipt.This warranty
does not cover damage from abuse, neglect,use for
commercial purposes, or any other use not found in
the printed “Instructions for use”booklet. Should the
customer choose to tamper with, or intentionally
dismantle the product, the Warranty will automatically
be deemed void.There is no warranty for glass parts,
glass containers, filter basket,blades and agitators.
HWI Breville® expressly disclaim all responsibility for
consequential damages for incidental losses caused
by use of this appliance. Some states or provinces do
not allow this exclusion or limitation for incidental or
consequential losses, so the foregoing disclaimer
may not apply to you.
ANY WARRANTY OF MERCHANTABILITY OR FITNESS
WITH RESPECT TO THIS PRODUCT IS ALSO LIMITED
TO THE ONE YEAR LIMITED WARRANTY PERIOD.
Some states or provinces do not allow disclaimer of
the implied warranty with respect to consumer
goods, so the foregoing disclaimer may not apply
to you.
This warranty gives you specific legal rights and you
may also have other legal rights which vary from
state to state or province to province.
If this appliance should become defective within the
warranty period, do not return the appliance to the
store. Please contace our Customer Service Center.
Toll free phone number:
1-866- BREVILLE (1-866-273-8455)
Internet email:
[email protected] (in Canada)
RECEIPT IS REQUIRED FOR ALL RETURNS
*HWI Breville® products are distributed in Canada by
Anglo Canadian Housewares, L.P.and in USA by
Metro/Thebe Inc.
BR8252 BCS600XL_Book_FRE_SPN 13/12/06 4:28 PM Page 14

17
Recipes
16
Page
Soups 18
Sauces 20
Drinks 23
Cocktails 25
Non-Alcoholic Drinks 26
Desserts 27
Baby Food 27
Recipes
BR8252 BCS600XL_Book_FRE_SPN 13/12/06 4:28 PM Page 16

19
Pumpkin and kumera soup
2 tablespoons light olive oil
2 cloves garlic, crushed
2 large leeks, washed and thinly sliced
3
3
⁄
8
lbs(1.5kg) pumpkin, peeled and chopped
1
3
⁄
4
lbs (750g) kumera, peeled and chopped
5 cups chicken stock
2 teaspoon ground cumin
Pepper,to taste
1 cup light sour cream
1 Using a large saucepan heat oil, saute garlic and
leeks until transparent and golden.
2. Add the next 4 ingredients, bring to the boil, then
reduce heat to simmer.
3. Simmer until vegetables have softened.
4. Remove from heat, cool slightly.
5. Place Cordless Hand Blender with the stainless
steel blending shaft attached into saucepan and
blend until soup is smooth. Fold in the remaining
ingredients. Serve.
Mediterranean
2 tablespoons olive oil
2 large Spanish onions, chopped
2 eggplants 1lbs (500g), chopped
5 zucchinis, chopped
1lbs(500g) tomatoes, chopped
3 cloves garlic
3 red capsicum, seeded and chopped
2 green capsicum, seeded and chopped
1 tablespoon pesto paste
5 cups chicken stock
Pepper,to taste
1. Using a large saucepan heat oil, saute onions
until slightly golden.
2. Add remaining ingredients, bring to the boil, then
reduce heat to simmer.
3. Simmer until vegetables are tender.
4. Remove from heat, cool slightly.
5. Place Cordless Hand Blender with the stainless
steel blending shaft attached into saucepan and
blend until soup is smooth. Serve.
18
Soups
Carrot and orange soup
2 tablespoons olive oil
2 onions, chopped
4
1
⁄
2
lbs(2kg) carrots, chopped
5 cups chicken stock
1
3
⁄
4
cups fresh orange juice
Pepper,to taste
1. Using a large saucepan heat oil, saute onions
until slightly golden.
2. Add remaining ingredients, bring to the boil, then
reduce heat to simmer.
3. Simmer until carrots have softened.
4. Remove from heat, cool slightly.
5. Place Cordless Hand Blender with the stainless
steel blending shaft attached into saucepan and
blend until soup is smooth. Serve.
Zucchini and potato soup
2 tablespoons olive oil
2 leeks, thinly sliced
1Ib (500g) washed potatoes, peeled and chopped
8 zucchinis, chopped
6
3
⁄
4
cups chicken stock
Pepper,to taste
1 cup cream
1. Using a large saucepan heat oil, saute leeks until
they have softened.
2. Add the next 3 ingredients.
3. Bring to the boil, then reduce heat to simmer.
4. Simmer until vegetables have softened.
5. Stir in cream and bring to the boil.
6. Remove from heat, cool slightly.
7. Place Cordless Hand Blender with the stainless
steel blending shaft attached into saucepan and
blend until soup is smooth. Serve.
Sweet coconut and spinach soup
2 tablespoons olive oil
2 cloves garlic, crushed
3 leeks, thinly sliced
1 tablespoon red curry paste
1 teaspoon ground cumin
1
3
⁄
4
lbs(800g) English spinach, chopped
2
1
⁄
2
cups chicken stock
1
⁄
2
lb (225g) kumara, peeled and chopped
3 Kaffir lime leaves or 1 teaspoon grated lime rind
1. Using a large saucepan heat oil, saute the first
2 ingredients until lightly softened.
2. Add the next two ingredients, cook over a high
heat for 1 minute, add remaining ingredients.
3. Bring to the boil, then reduce heat to simmer.
4. Simmer until all vegetables have softened.
5. Remove from heat, cool slightly.
6. Place Cordless Hand Blender with the stainless
steel blending shaft attached in the saucepan and
blend soup until smooth. Serve.
BR8252 BCS600XL_Book_FRE_SPN 13/12/06 4:28 PM Page 18

21
Basic mayonnaise
1 egg
1
⁄
4
teaspoon salt
1 teaspoon mustard (optional)
1
⁄
2
teaspoon sugar
Pinch cayenne pepper
1
1
⁄
2
tablespoons lemon juice
3
⁄
4
cup vegetable oil
1. Place the first 6 ingredients into a
medium mixing bowl.
2. Place the Cordless Hand Blender assembled
with smoothie attachment into the ingredients
and blend.
3. With Cordless Hand Blender still blending,
gradually drizzle oil into egg mixture; blend until
thick and smooth.
Flavor variations for mayonnaise
2 tablespoons freshly prepared pesto
Or
2 tablespoons sundried tomatoes, finely diced
1 tablespoon freshly snipped chives
Or
1 teaspoon tandoori paste
1 tablespoon mango chutney
Or
1
⁄
2
cup corn relish
1. Blend in a selected flavor variation when the
mayonnaise is thick and smooth.
Spicy tartar sauce
1
1
⁄
4
cup egg mayonnaise
2 tablespoons lime juice
2 small red chillies, chopped
1 teaspoon grated lime rind
3
⁄
4
cup chopped pickled gerkins
2 tablespoons freshly snipped chives
2 tablespoons capers, drained
1. Place all ingredients into mixing jug.
2. Place the Cordless Hand Blender with the stainless
steel blending shaft attached into the ingredients
and blend until smooth.
3. Serve with seafood, fish or steak.
Citrus and coriander dressing
3
⁄
4
cup orange juice, freshly squeezed
2 tablespoons lime juice
3 tablespoons sweet Thai chilli sauce
2 tablespoons coriander leaves
2 tablespoons rice wine vinegar
2 tablespoons extra virgin olive oil
1. Place all ingredients into mixing jug.
2. Place the Cordless Hand Blender with the stainless
steel blending shaft attached into the ingredients
and blend until smooth.
3. Serve over salad.
Sauces
Tomato and red pepper dip
2 tablespoons olive oil
4 roasted red capsicums,seeded and peeled
1 Spanish onion, chopped
3 cloves garlic, crushed
3
1
⁄
2
oz (100g) sundried tomatoes, drained
2 teaspoons sweet paprika
2 small red chillies
1. Place all ingredients into a large mixing bowl.
2. Place the Cordless Hand Blender with the stainless
steel blending shaft attached into the ingredients
and blend until smooth.
Basic bechamal sauce
3 tablespoons butter
3 tablespoons plain flour
1cup milk
Pepper and salt, to taste
1. Melt butter in a small saucepan over
medium heat.
2. Stir in flour and cook for 1 minute.
3. Remove from heat.
4. Gradually add the milk, using the Cordless Hand
Blender with stainless blending shaft attached to
blend the ingredients until smooth.
5. Return to the heat and continue blending mixture
until sauce boils and thickens.
6. Season with pepper and salt, if desired.
Variations:
Cheese sauce
1 cup grated Cheddar cheese,
1 teaspoon English mustard
Herb sauce
3 shallots, thinly sliced
3 tablespoons freshly chopped parsley
1 tablespoon finely snipped dill
Spicy tomato and bacon pasta sauce
15 Roma Italian tomatoes
2 Spanish onions, chopped
3 tablespoons extra virgin olive oil
2 cloves garlic, crushed
6 strips bacon, finely chopped and lightly fried
1
⁄
4
cup sweet Thai chilli sauce
1
⁄
4
cup balsamic vinegar
Freshly ground black pepper
1. Place all ingredients into a large mixing bowl.
2. Place the Cordless Hand Blender with stainless
steel blending shaft attached into the ingredients
and blend until smooth.
3. Serve hot or cold over cooked pasta of your choice.
Smoked salmon and dill pasta sauce
10
1
⁄
2
oz (300g) smoked salmon
2 tablespoons fresh dill
1 teaspoon grated lemon rind
1
1
⁄
4
cups sour cream
1 tablespoon lemon juice
7oz (200g) light cream cheese
2 teaspoons French mustard
1. Place all ingredients into a large mixing bowl.
2. Place the Cordless Hand Blender with stainless
steel blending shaft attached into the ingredients
and blend until smooth.
3. Serve hot or cold over cooked pasta of your choice.
20
BR8252 BCS600XL_Book_FRE_SPN 13/12/06 4:28 PM Page 20

Drinks
23
Milkshakes
1 cup chilled milk
2 scoops vanilla ice cream
1
⁄
4
teaspoon vanilla extract
1. Place all ingredients into mixing jug.
2. Place the Cordless Hand Blender assembled with
the smoothie attachment into the ingredients and
blend until smooth and frothy (about 30 seconds).
Flavor variations
Chocolate
Add 1 tablespoon chocolate syrup
Or
1
⁄
2
tablespoon cocoa and
1
⁄
2
tablespoon malt.
Strawberry
Add 1 tablespoon strawberry syrup.
Cool banana
Makes 4 small glasses
1 cup chilled milk
1 medium banana, peeled and chopped
2 tablespoons malted milk powder
1 teaspoon chopped fresh mint
2 scoops vanilla ice cream
Mint sprigs, for garnish
1. Place all ingredients except garnish into
mixing jug.
2. Place the Cordless Hand Blender with the stainless
steel blending shaft attached into the ingredients
and blend until thick and smooth (about 30 seconds).
3. Pour into glasses,garnish and serve immediately.
Banana strawberry soy
Makes 4 small glasses
1 cup chilled vanilla soy milk
5
1
⁄
2
oz (150g) strawberries, hulled and halved
1 medium banana, peeled,cut into quarters
2 scoops vanilla ice cream
Extra strawberries, for garnish
1. Place all ingredients except garnish into
mixing jug.
2. Place Cordless Hand Blender with the stainless
steel blending shaft attached into the ingredients
and blend until thick and smooth (about 30
seconds).
3. Pour into glasses,garnish and serve immediately.
Big berry
Makes 4 small glasses
1 cup chilled milk
3
1
⁄
2
oz (100g) strawberries, hulled and halved
3
1
⁄
2
oz (100g) blueberries
1
3
⁄
4
oz (50g) raspberries
2 teaspoons chopped fresh mint
2 scoops vanilla ice cream
Extra berries and mint sprigs, for garnish
1. Place all ingredients into mixing jug.
2. Place the Cordless Hand Blender with the
stainless steel blending shaft attached into
the ingredients and blend until thick and
smooth (about 30 seconds).
3. Pour into glasses,garnish and serve immediately.
Sauces
Spicy satay sauce
2 cups shelled peanuts
3 tablespoons lemon juice
1 cup chicken stock
1 cup coconut cream
1
⁄
4
cup sweet Thai chilli sauce
1
⁄
4
cup fruit chutney
1 tablespoon Mussaman curry paste
1. Place all ingredients into a medium mixing bowl.
2. Place the Cordless Hand Blender with the stainless
steel blending shaft attached into the ingredients
and blend until smooth.
3. Serve with barbecued steak, chicken or lamb.
Cucumber and mint raita
2
1
⁄
2
cups thick Greek style yogurt
2 Lebanese cucumbers, seeded and chopped
1 teaspoon flaked sea salt
1 teaspoon ground cumin
1
⁄
3
cup mint leaves
1. Place all ingredients into mixing jug.
2. Place the Cordless Hand Blender with the stainless
steel blending shaft attached into the ingredients
and blend until smooth.
3. Serve as an accompaniment with curries.
Olive and Herb Tapenade
1
⁄
2
lb black olives, pitted
2 tablespoons sweet thai chilli sauce
2 cloves garlic
2 tablespoons olive oil
1 tablespoon balsamic vinegar
2 tablespoons coriander
2 shallots, chopped
1. Place all ingredients into the chopper bowl.
2. Assemble the Cordless Hand Blender on the
chopper bowl and blend the ingredients
until smooth.
Serve on warm crusty bread.
Basic pesto sauce
1 cup fresh basil leaves
1 tablespoon fresh lemon juice
2 tablespoons extra virgin olive oil
2 cloves garlic
1
⁄
4
cup roasted peanuts
Freshly ground black pepper
1. Place all ingredients into the chopper bowl.
2. Assemble the Cordless Hand Blender on
the chopper bowl and blend the ingredients
until smooth.
22
BR8252 BCS600XL_Book_FRE_SPN 13/12/06 4:28 PM Page 22

Cocktails
25
Margarita
2 floz (60 ml) tequila
2 floz (60 ml) cointreau
2
2
⁄
3
floz (80 ml)lime juice
12 ice cubes
1. Place all ingredients into mixing jug.
2. Place Cordless Hand Blender with the stainless
steel blending shaft attached into the ingredients
and blend until well combined and ice is crushed
(approx 30 seconds).
Serve in salt rimmed glasses.
Daiquiris
Basic Recipe
About 1 cup fruit
4 floz (120ml) white spirits
(white rum, vodka,kirsch)
4 floz (60ml) sugar syrup
1 cup ice
1. Place all ingredients into mixing jug.
2. Place Cordless Hand Blender with the stainless
steel blending shaft attached into the ingredients
and blend until smooth (approx 30 seconds).
3. Pour into glasses and seve immediately.
Most fresh fruit and berries can be used. If using
frozen fruit defrost before use. Fruit with hard
skins or stones must have them removed before
pureeing. Large fruit must be diced first.
Note
Drinks
So good
Makes 4 small glasses
1 cup chilled vanilla soy milk
1 medium banana, peeled and chopped
1
⁄
4
cup seeded and finely chopped fresh dates
1 tablespoon finely chopped glace ginger
1 tablespoon honey
1 teaspoon vanilla extract
2 scoops Creamy Vanilla Dairy-free ice cream
1. Place all ingredients into mixing jug.
2. Place Cordless Hand Blender with stainless steel
blending shaft attached into the ingredients and
blend until thick and smooth (about 30 seconds).
3. Pour into glasses and serve immediately.
Chocolate caramel delight
Makes 4 small glasses
1
1
⁄
2
cups chilled chocolate or caramel milk
2 chocolate coated vanilla, chocolate or caramel
ice cream bars, sticks removed and chopped
2 tablespoons chocolate or caramel fudge sauce
Grated chocolate, for garnish
1. Place all ingredients except garnish into
mixing jug.
2. Place Cordless Hand Blender with stainless steel
blending shaft attached into the ingredients and
blend until thick and smooth (about 30 seconds).
3. Pour into glasses,garnish and serve immediately.
White wonder
Makes 4 small glasses
3
⁄
4
cup chilled milk
1
⁄
2
cup plain yoghurt
2 tablespoons maple syrup
1 teaspoon vanilla extract
3 scoops vanilla ice cream
1. Place all ingredients into mixing jug.
2. Place Cordless Hand Blender assembled with the
smoothie attachment into the ingredients and
blend until thick and smooth (about 30 seconds).
3. Pour into glasses and serve immediately.
Get up and go breakfast shake
1
⁄
2
cup chilled milk
1
⁄
2
cup chilled fruit juice
1 egg
1 tablespoon honey
1. Place all ingredients into mixing jug.
2. Place the Cordless Hand Blender assembled with
the smoothie attachment into the ingredients and
blend until smooth and creamy (about 30 seconds).
3. Pour into glasses and serve immediately.
24
BR8252 BCS600XL_Book_FRE_SPN 13/12/06 4:28 PM Page 24

Desserts / Baby food
27
Crepe batter
1
1
⁄
2
cups plain flour
Pinch salt
2 eggs
1
1
⁄
2
cups milk
1 tablespoon oil
1. Place all ingredients into mixing jug.
2. Place the Cordless Hand Blender with the stainless
steel blending shaft attached into the ingredients
and blend until just combined (about 40 seconds).
3. Pour
1
⁄
4
cup of mixture into a preheated and lightly
greased frypan. Cook until light golden brown, turn
and cook other side. Remove,keep warm. Repeat
with remaining mixture.
4. Serve hot drizzled with lemon juice and sprinkled
with finely granulated sugar.
Vegetable blend
1 cup steamed vegetables
1. Place vegetables into mixing jug.
2. Place the Cordless Hand Blender with stainless
steel blending shaft attached into vegetables and
blend until smooth (about 30 seconds).
Liquids (for example milk, formula or water) may
be added to thin the mixture down depending on
the age of the child.
Note
Non-Alcoholic Drinks
Fruit Cocktail
1 cup pineapple juice
1 banana, peeled and chopped
1 orange, skin and pith removed and quartered
1 cup soda water
2 tablespoons passionfruit pulp
1. Place pineapple juice, banana and orange into
mixing jug.
2. Place the Cordless Hand Blender with the stainless
steel blending shaft attached into the ingredients
and blend until smooth (approx 30 seconds).
3. Stir in passionfruit pulp and soda water and serve.
Rockmelon and pineapple frappe
1 cup chopped rockmelon
1 cup canned pineapple pieces
1 cup ice
Mint leaves, to serve
1. Place rockmelon, pineapple and ice into the
mixing jug.
2. Place the Cordless Hand Blender with the stainless
steel blending shaft attached into the ingredients
and blend until ice is crushed and mixture is
smooth and thick.
Serve with chopped mint leaves.
26
BR8252 BCS600XL_Book_FRE_SPN 13/12/06 4:28 PM Page 26

Mélangeur portatif
sans fil
Model BCS600XL
Breville est une marque enregistrée de Breville
Service à la clientèle Breville
Consommateurs des Etats-Unis
✉
PO Box 47170
Gardena
CA 90247
☎
Service Centre: 1 (866) BREVILLE
Email [email protected]
www.breville.com
Clientèle du Canada
✉
Anglo Canadian HWI
2555, de l’Aviation
Pointe-Claire (Montréal) Québec
H9P 2Z2
☎
Téléphone sans frais: 1 (866) BREVILLE
Télécopieur: (514) 683-5554
Courriel: [email protected]
www.breville.com
© Copyright. Breville Pty.Ltd. 2006
En raison des améliorations constantes apportées à nos produits,
le produit que vous avez acheté pourrait varier légèrement de
celui illustré dans ce livret.
Model BCS600XL Issue 1/06
BR8252 BCS600XL_Book_FRE_SPN 13/12/06 4:28 PM Page 28

Félicitations
pour l’achat de votre nouveau mélangeur portatif sans fil de Breville
Table des matières
Page
Breville vous recommande la sécurité avant tout 4
Faites la connaissance de votre mélangeur portatif sans fil de Breville
6
Le fonctionnement de votre mélangeur portatif sans fil de Breville
7
Mélangeur portatif sans fil de Breville (accessoire de mélange)
- assemblage et utilisation 10
Mélangeur portatif sans fil de Breville
(fouet à boissons fouettées) - assemblage et utilisation 12
Mélangeur portatif sans fil de Breville (accessoire pour hacher)
– assemblage et utilisation 13
Entretien, nettoyage et rangement 14
Garantie 15
Recettes 17
30
BR8252 BCS600XL_Book_FRE_SPN 13/12/06 4:28 PM Page 30

33
• Ne retirez pas l’appareil des ingrédients lors du
mélange. Ne le faites que si l’appareil est hors
tension et le moteur complètement immobilisé.
Vous éviterez ainsi de toucher aux couteaux en
mouvement ou au fouet à boissons fouettées, et
préviendrez l’éclaboussure de liquides chauds.
• Afin de prévenir les risques de secousses
électriques, ne plongez ni le boîtier du moteur,
la fiche du chargeur, le cordon d’alimentation ou
le socle de chargement dans l’eau ou tout
autre liquide.
• Utilisez seulement la fiche du chargeur et le socle
de chargement fournis avec l’appareil pour
recharger ce dernier.
• Ne tentez pas d’utiliser la fiche du chargeur et le
socle de chargement avec d’autres produits.
• Ne manipulez pas la fiche du chargeur, le socle de
chargement ou l’appareil avec les mains mouillées.
• Assurez-vous que l’appareil soit toujours propre.
Respectez les consignes de nettoyage du présent
mode d’emploi.
• Ne jetez pas l’appareil à l’incinérateur, même s’il
est très endommagé. La pile peut exploser au
contact du feu.
• Lorsque vous mélangez des liquides très chauds,
utilisez un récipient de plus grande taille ou traitez
de plus petites quantités à la fois, afin d’éviter les
éclaboussures.
Importantes mesures de protection pour tous
appareils électriques
• Ne laissez pas le cordon du socle de chargement
pendre d’une table ou d’un comptoir, entrer
en contact avec des surfaces très chaudes ou
se nouer.
• L’appareil ne doit pas être utilisé par de jeunes
enfants ou des personnes handicapées, sauf sous
la surveillance d’une personne responsable qui
s’assure d’une utilisation sécuritaire.
• Il faut surveiller les jeunes enfants pour ne
pas qu’ils jouent avec l’appareil lorsqu’il est
en fonction.
• Il est conseillé de vérifier régulièrement l’appareil.
Ne l’utilisez pas si le chargeur, le cordon
d’alimentation, le socle de chargement ou l’appareil
sont endommagés. Rapportez-le à un centre de
service autorisé Breville pour inspection ou
réparation.
• Tout entretien autre que le nettoyage doit être
effectué dans un centre de service autorisé
Breville.
• Cet appareil est conçu pour une utilisation
domestique seulement. Utilisez-le uniquement aux
fins prévues. Ne l’utilisez pas dans une voiture,un
bateau ou à l’extérieur.
CONSERVER CES INSTRUCTIONS
Breville vous recommande la sécurité avant tout
Chez Breville, la sécurité occupe une place de choix. Nous concevons et fabriquons des produits destinés au
consommateur sans jamais perdre de vue la sécurité de notre précieuse clientèle. De plus,nous vous demandons
d’être très vigilant lorsque vous utilisez un appareil électro-ménager et de respecter les mesures de sécurité suivantes :
IMPORTANTES MESURES DE PROTECTION POUR VOTRE
MÉLANGEUR PORTATIF SANS FIL DE BREVILLE
• Veuillez lire attentivement toutes les instructions
avant d'utiliser l'appareil et conservez-les pour
consultation future.
• Enlevez tous les matériaux d’emballage et les
étiquettes promotionnelles du mélangeur portatif
sans fil avant la première utilisation.
• Ne placez pas l’appareil (y compris le socle de
chargement) près du rebord d’un comptoir ou d’une
table lorsqu’il fonctionne ou lorsque vous le chargez.
Assurez-vous que la surface soit de niveau, propre
et sans trace d’eau, de farine ou autres.
• Placez l’appareil (y compris le socle de
chargement) sur un comptoir ou installez-le au mur
loin de l’évier ou de surfaces chaudes.
• Ne laissez pas l’appareil (y compris le socle de
chargement) sur ou près d’une cuisinière au gaz ou
d’un élément électrique, et éviter tout contact avec
un four chaud.
• Assurez-vous que l’appareil soit correctement
assemblé avant de l’utiliser.
• Assurez-vous que l’accessoire de mélange, le fouet
à boissons fouettées et le bol à hacher soient bien
fixés au boîtier du moteur avant d’utiliser l’appareil.
• Ne tentez pas d’utiliser l’appareil autrement que
selon la méthode décrite dans le présent mode
d’emploi.
• Ne débranchez pas la fiche de la prise murale en
tirant sur le cordon. Ne transportez jamais
l’appareil ni le socle de chargement par le cordon.
Saisissez la fiche du chargeur pour la débrancher
de la prise. Ne laissez pas le cordon traîner sur une
surface tranchante ou angulaire.
• Lorsque vous utilisez l’appareil pour mélanger des
aliments chauds dans une casserole, retirez la
casserole du feu et assurez-vous que le liquide ne
bout pas. Laissez les aliments chauds refroidir
légèrement avant de les mélanger. Éloignez
toujours l’appareil de toute source de chaleur.
• Manipulez l’appareil et les accessoires avec soin;
rappelez-vous que les couteaux de l’accessoire de
mélange sont tranchants ; gardez-les donc hors de
portée des enfants.
• Utilisez seulement les accessoires fournis
avec l’appareil.
• Ne laissez pas l’appareil fonctionner pendant plus
de 60 secondes. Laissez le moteur reposer pendant
une minute entre chaque utilisation.
• Ne laissez pas l’appareil sans surveillance
lorsqu’il fonctionne.
• Assurez-vous que le socle de chargement de
l’appareil soit hors tension et débranché avant de
le déplacer, le nettoyer ou le ranger.
• Assurez-vous que l’appareil soit hors tension avant
d’y installer un accessoire. Grâce à son système de
sécurité, l’appareil ne fonctionnera que si vous
enfoncez simultanément le bouton de mise en
marche et le bouton de réglage de la vitesse.
• Lorsque des aliments se coincent dans les
couteaux, mettez l’appareil hors tension et retirez
l’accessoire de mélange du boîtier du moteur.
Utilisez une spatule pour dégager l’aliment.
N’utilisez pas vos doigts car les couteaux sont
tranchants. Grâce à son système de sécurité,
l’appareil ne fonctionnera que si vous enfoncez
simultanément le bouton de mise en marche et
le bouton de réglage de la vitesse.
32
BR8252 BCS600XL_Book_FRE_SPN 13/12/06 4:28 PM Page 32

Le fonctionnement de votre mélangeur portatif
sans fil de Breville
35
Avant la première utilisation
Retirez tout matériau d’emballage et étiquette
promotionnelle. Enlevez le mélangeur de l’emballage
et lavez-le à l’eau chaude savonneuse. Rincez et bien
asséchez.Assurez-vous qu’il ne reste plus d’eau
dans le mélangeur afin d’éviter que l’eau n’entre
dans le boîtier du moteur lors de l’assemblage.
Démontez le récipient, le couvercle et le fouet à
boissons fouettées, puis lavez-les à l’eau chaude
savonneuse. Rincez et bien asséchez.Assurez-vous
qu’il ne reste plus d’eau dans le fouet à boissons
fouettées afin d’éviter que l’eau n’entre dans le
boîtier du moteur lors de l’assemblage.
Il est déconseillé de placer toute composante de
l’appareil au lave-vaisselle.
Contrairement aux mélangeurs électriques, le
mélangeur portatif sans fil peut être utilisé dans un
évier ou sur une cuisinière. Il faut toutefois éviter de
plonger le boîtier du moteur dans l’eau ou tout autre
liquide. Lorsque vous utilisez l’appareil pour mélanger
des aliments chauds dans une casserole, retirez la
casserole du feu et assurez-vous que le liquide ne
bout pas. Laissez les aliments chauds refroidir
légèrement avant de les mélanger. Éloignez toujours
l’appareil d’une source de chaleur.
Le socle de chargement fonctionne à basse tension
mais il sera endommagé s’il est plongé dans l’eau. Il
faut toujours le placer dans un endroit propre et sec,
à une bonne distance de l’eau ou d’autres liquides.
Chargement de la pile avant
la première utilisation
TLa pile du boîtier du moteur de l’appareil est à peine
ou non chargée lors de la livraison. Il faut compter
environ cinq heures pour la recharger complètement
lorsqu’elle est à plat. Par la suite, il faudra au moins
deux heures pour la recharger afin qu’elle fonctionne
normalement.
Les charges subséquentes devraient prendre moins
de temps selon la durée de mise hors tension du
socle de chargement.
Le boîtier du moteur a été conçu pour être déposé
sur le socle de chargement et y être laissé en tout
temps lorsque l’appareil ne sert pas. Le boîtier du
moteur est muni d’un circuit électronique à protection
spéciale qui empêche la surchauffe. Contrairement
aux autres types de piles rechargeables, les piles à
hydrure métallique de nickel (NiMh) de haute qualité
sont très performantes, d’une durée prolongée et
peuvent être rechargées avant qu’elles ne soient
à plat.
Toutes les piles rechargeables perdent de leur
capacité au fil du temps. Lorsque la pile semble
ralentir le temps de fonctionnement de l’appareil, il
suffit de retourner celui-ci à un centre de service de
Breville pour y faire remplacer la pile.
LE MÉLANGEUR PORTATIF SANS FIL EST UN APPAREIL POLYVALENT.
LE BOÎTIER DU MOTEUR DE L’APPAREIL PEUT ÊTRE FIXÉ :
•À L’ACCESSOIRE DE MÉLANGE EN ACIER INOXYDABLE – POUR SERVIR DE MÉLANGEUR
•AU FOUET À BOISSONS FOUETTÉES – POUR SERVIR DE MÉLANGEUR
•AU BOL À HACHER AVEC LAME ET COUVERCLE – POUR SERVIR DE HACHOIR OU DE
ROBOT CULINAIRE
Faites la connaissance de votre mélanger
portatif sans fil de Breville
34
Pile de 12V de longue durée
Bouton-poussoir à deux vitesses
légère pression pour la basse vitesse, pression
ferme pour la vitesse élevée
Grâce à son système de sécurité
l’appareil ne fonctionnera que si vous enfoncez simultanément le
bouton de mise en marche et le bouton de réglage de vitesse.
Fonctionnement sans fil
Tige amovible facilitant le nettoyage
Couteaux en acier inoxydable pour concasser les glaçons
Le récipient pour mélanger d’une capacité de 1 litre
(34 oz) muni d’un couvercle pour le rangement
est idéal pour mélanger, mesurer et traiter une
variété d’aliments. Le couvercle peut également
servir de socle antidérapant lorsqu’on le place en
dessous du récipient
Fouet à boissons fouettées breveté
pour fouetter et aérer
Support mural facultatif compris
Le témoin de
chargement indique
si l’appareil est en cours
de chargement (rouge)
ou complètement
chargé (vert).
Socle de chargement
sur 360° avec espace
de rangement du cordon
Bol pour hacher
à utiliser comme mini hachoir ou mini robot culinaire.
Cet accessoire n'apparaît pas sur l'illustration.
BR8252 BCS600XL_Book_FRE_SPN 13/12/06 4:28 PM Page 34

37
Le mélangeur portatif sans fil est muni d’une fiche de
chargement compacte qui prend peu d’espace autour
du cordon. Lorsque vous la branchez,la fiche du
chargeur reste toujours chaude, même lorsque le
témoin passe du rouge au vert.
Le socle de chargement comporte un espace pour
ranger le surplus du cordon. Il suffit de tirer sur le
cordon jusqu’à l’obtention de la longueur désirée.
L’excédent du cordon peut être enroulé dans le trou
sous le socle de chargement.
Lorsque vous voulez installer le socle de chargement
au mur, faites ce qui suit.
1. Trouvez un endroit pratique à moins de 1 m
d’une prise. Lorsque vous installez le socle de
chargement plus près d’une prise, enroulez le
surplus du cordon dans le trou sous le socle.
2. Placez le support mural contre le mur à l’endroit
voulu en marquant l’emplacement des trous à
percer pour les vis (fig. 3).
3. Percez un trou de 5 mm (0,2 po) de diamètre au
centre de chacune des marques. Insérez un
ancrage en plastique dans chacun des trous.
4. Insérez une vis dans chacun des trous et serrez-
la jusqu’à ce que la tête de la vis soit à 3 mm
(0,1 po) de la surface du mur.
5. Faites glisser le support mural sur les vis et
installez le socle de chargement sur le support.
Le mélangeur portatif sans fil est muni d’un
interrupteur de sécurité qui empêche l’appareil de
fonctionner accidentellement. Pour le mettre en
marche, suivre les étapes suivantes :
1. Enfoncer le bouton de mise en marche
durant l seconde.
2. En tenant le bouton de mise en marche
enfoncé, pesez sur le bouton de réglage
de la vitesse.
3. Pour choisir la vitesse désirée :
I. Pour la basse vitesse, enfoncez doucement le
bouton de réglage de la vitesse.
II. Pour la haute vitesse, enfoncez fortement le
bouton de réglage de la vitesse.
Si l’appareil ne fonctionne pas, verifier les étapes
suivantes:
1.S’assurer que le bouton de mise en marche est
bien enfoncé.
2. S’assurer que le bouton de mise en marche et
le bouton de réglage de la vitesse sont tous les
deux enfoncés.
Note
Fig 3
X
X
Mark drill holes here
Fig 4
Fig 5
Le fonctionnement de votre mélangeur portatif sans fil
de Breville
suite
Protection contre la surcharge et la
basse tension
L’appareil est muni d’un disjoncteur qui s’active
instantanément en cas de surcharge. Ce dispositif
protège le moteur et la pile contre les accumulations
excessives de chaleur. Il suffit ensuite de redémarrer
l’appareil. En cas d’activation du disjoncteur,réduisez
le volume d’aliments et traitez de plus petites
quantités à la fois.
L’appareil comporte un deuxième disjoncteur qui
s’active lorsque la pile est pratiquement à plat,
protégeant ainsi la durée des piles rechargeables qui
diminue en cas de surcharge. Lorsque l’appareil est
mis hors tension sans surcharge, déposez-le dans le
socle de chargement jusqu’à ce qu’il soit
suffisamment rechargé.
Durée de fonctionnement
La durée de fonctionnement de l’appareil varie
grandement en fonction du type et de la quantité
d’aliments traités. Elle peut normalement excéder dix
minutes dans des conditions normales lorsque la pile
est neuve et chargée à bloc.
Procédures de chargement de la pile
1. Branchez la fiche du socle de chargement dans
une prise de 110-120 volts.
2. Placez le boîtier du moteur de l’appareil
fermement dans le socle de chargement en vous
assurant que le témoin rouge s’allume. La pile de
votre appareil commence alors à se charger.
Lorsque celle-ci est chargée à bloc, le témoin
devient vert.
3. Pour maintenir la charge de la pile du boîtier du
moteur, laissez le socle de chargement branché
dans une prise de courant standard. Pendant le
chargement, la fiche du chargeur peut devenir
chaude au toucher; il s’agit d’une situation
normale. Il est impossible de trop charger la pile
car l’appareil est doté d’un circuit de protection
contre la surcharge.
Socle de chargement
Le socle permet de recharger l’appareil et comprend
un espace de rangement pour le fouet à boissons
fouettées et pour le surplus de cordon (fig. 1).Le
socle de chargement peut être installé au mur (fig.2)
ou déposé sur une surface horizontale telle un
comptoir ou une tablette.
36
Fig 1
Fig 2
BR8252 BCS600XL_Book_FRE_SPN 13/12/06 4:28 PM Page 36

39
3. Traitez les aliments qui se trouvent dans le
récipient en exerçant un léger mouvement de
haut en bas.
4. Mettez l’appareil hors tension en relâchant les
boutons de mise en marche et de réglage de
la vitesse.
5. Assurez-vous de l’immobilité complète du
moteur avant de soulever l’appareil hors
du récipient.
Mélangeur portatif sans fil de Breville
(mélangeur) – assemblage et utilisation
Recommandations relatives à l’utilisation du
mélangeur portatif sans fil
• L’appareil mélange rapidement les aliments et
les liquides. Pour éviter de trop les mélanger,
n’oubliez pas de surveiller les aliments tout au
long du traitement.
• L’accessoire de mélange en acier inoxydable du
mélangeur portatif sans fil permet de traiter des
aliments chauds directement dans la casserole.
Cette caractéristique facilite la préparation des
soupes et des sauces. Par mesure de sécurité,
retirez la casserole du feu avant le traitement.
Assurez-vous que l’appareil soit éloigné de toute
source de chaleur.
• Afin d’obtenir un mélange onctueux et homogène
ou de la purée, coupez les aliments en morceaux
de dimensions uniformes.
• Réchauffez les liquides à être ajoutés aux
soupes et aux sauces afin d’assurer l’homogénéité
du mélange.
• Pour plus de stabilité, utilisez le couvercle de
rangement du récipient comme socle antidérapant
pendant le mélange.
• N’utilisez pas l’appareil pendant plus de 60
secondes. Laissez le moteur reposer pendant une
minute entre chaque utilisation.
Lorsque des aliments se coincent dans
les couteaux ou dans le protecteur,
prenez les mesures de sécurité
fondamentales suivantes.
1. Mettez l’appareil hors tension en relâchant les
boutons de mise en marche et de réglage de
la vitesse.
2. Retirez l’accessoire de mélange du boîtier
du moteur.
3. Utilisez une spatule pour dégager l’aliment.
N’utilisez pas vos doigts car les couteaux
sont tranchants.
4. Après avoir retiré l’aliment et dégagé les
couteaux, remettez l’accessoire de mélange
en place et continuez de mélanger.
Mélangeur portatif sans fil de Breville (mélangeur) –
assemblage et utilisation
Retrait de l’accessoire de mélange en
acier inoxydable
Assurez-vous que l’appareil est hors tension en
relâchant les boutons de mise en marche et de
réglage de la vitesse. Dévissez l’accessoire de
mélange du boîtier du moteur dans le sens
horaire (fig. 1).
Installation de l’accessoire de mélange
en acier inoxydable
Saisissez la tige en plaçant les couteaux vers le bas
et alignez le haut de l’accessoire de mélange sur
l’extrémité correspondante du boîtier du moteur.
Vissez la tige dans le boîtier du moteur dans le
sens antihoraire.
Utilisation de l’accessoire de mélange
Assurez-vous que l’accessoire de mélange soit
correctement assemblé, tel qu’illustré sur la gauche.
1. Placez les aliments à traiter dans le récipient
fourni (ou dans un bol à mélanger ou une
casserole de format approprié). Lorsque vous
traitez des liquides, il ne faut pas dépasser la
marque LIQUID MAX inscrite sur le récipient.
2. Enfoncez l’accessoire de mélange au maximum
dans le récipient et appuyez sur le bouton de
mise en marche (le bouton du haut) pour activer
l’appareil.Tout en enfonçant le bouton de mise
en marche, enfoncez le bouton de réglage de la
vitesse (celui du bas). Pour choisir la vitesse
voulue, il faut enfoncer le bouton légèrement
pour obtenir la basse vitesse ou fermement, pour
la vitesse élevée. Il faut enfoncer simultanément
les deux boutons et les maintenir enfoncés pour
la durée du traitement (fig. 2).
38
Fig 1
Power button
Speed button
Fig 2
LA LAME EN ACIER INOXIDABLE DE L’ACCESSOIRE DE MÉLANGE EST EXTRÊMEMENT
TRANCHANTE; GARDEZ LES DOIGTS LOIN DE LA LAME EN TOUT TEMPS.
BR8252 BCS600XL_Book_FRE_SPN 13/12/06 4:28 PM Page 38
A página está carregando...
A página está carregando...
A página está carregando...
A página está carregando...
A página está carregando...
A página está carregando...
A página está carregando...
A página está carregando...
A página está carregando...
A página está carregando...
A página está carregando...
A página está carregando...
A página está carregando...
A página está carregando...
A página está carregando...
A página está carregando...
A página está carregando...
A página está carregando...
A página está carregando...
A página está carregando...
A página está carregando...
A página está carregando...
A página está carregando...
A página está carregando...
-
 1
1
-
 2
2
-
 3
3
-
 4
4
-
 5
5
-
 6
6
-
 7
7
-
 8
8
-
 9
9
-
 10
10
-
 11
11
-
 12
12
-
 13
13
-
 14
14
-
 15
15
-
 16
16
-
 17
17
-
 18
18
-
 19
19
-
 20
20
-
 21
21
-
 22
22
-
 23
23
-
 24
24
-
 25
25
-
 26
26
-
 27
27
-
 28
28
-
 29
29
-
 30
30
-
 31
31
-
 32
32
-
 33
33
-
 34
34
-
 35
35
-
 36
36
-
 37
37
-
 38
38
-
 39
39
-
 40
40
-
 41
41
-
 42
42
-
 43
43
-
 44
44


Breville BCS600XL Manual do usuário
- Categoria
- Liquidificadores
- Tipo
- Manual do usuário
em outras línguas
- español: Breville BCS600XL Manual de usuario
- français: Breville BCS600XL Manuel utilisateur
- English: Breville BCS600XL User manual
Artigos relacionados
Outros documentos
-
Palson Bahamas 30527 Manual do proprietário
-
Moulinex LM600E Manual do proprietário
-
Moulinex LM6208FR Manual do proprietário
-
Hamilton Beach 59759 Guia de usuario
-
KitchenAid 5KHB2571 Hand Blender Manual do proprietário
-
BLACK+DECKER FC500 Manual do usuário
-
Cuisinart individuel sans fil RPB100E Manual do proprietário
-
Frigidaire FPJB56B7MS Manual do proprietário
-
Oster 2619 Manual do usuário
-
 Russell Hobbs RHSC050 Manual do usuário
