Philips 42PF9630/78 Manual do usuário
- Categoria
- TVs LCD
- Tipo
- Manual do usuário
Este manual também é adequado para

User Manual
Mode d’emploi
Manual de instrucciones
Instruções de Uso
EnglishEspañolPortugues
cover 2454.2 04-10-2005 08:47 Pagina 1

8204 003 2245.1
cover 2454.2 04-10-2005 08:47 Pagina 2

1. Read these instructions.
2. Keep these instructions.
3. Heed all warnings.
4. Follow all instructions.
5. Do not use this apparatus near water.
6. Clean only with a dry cloth.
7. Do not block any of the ventilation openings. Install in
accordance with the manufacturers instructions.
8. Do not install near any heat sources such as radiators, heat
registers, stoves, or other apparatus (including amplifiers) that
produce heat.
9. Protect the power cord from being walked on or pinched
particularly at plugs, convenience receptacles, and the point
where they exit from the apparatus.
10. Only use attachments/accessories specified by the
manufacturer.
11. Use only with a cart, stand, tripod, bracket, or
table specified by the manufacturer, or sold with
the apparatus.When a cart is used, use caution
when moving the cart/apparatus combination to avoid injury
from tip-over.
12. Unplug this apparatus during lightning storms or when unused
for long periods of time.
13. Refer all servicing to qualified service personnel. Servicing is
required when the apparatus has been damaged in any way,
such as power-supply cord or plug is damaged, liquid has been
spilled or objects have fallen into apparatus, the apparatus has
been exposed to rain or moisture, does not operate normally,
or has been dropped.
14. This product may contain lead or mercury. Disposal of these
materials may be regulated due to environmental
considerations. For disposal or recycling information, please
contact your local authorities
15. Damage Requiring Service - The appliance should be
serviced by qualified service personnel when:
A. The power supply cord or the plug has been damaged; or
B. Objects have fallen, or liquid has been spilled into the
appliance; or
C. The appliance has been exposed to rain; or
D. The appliance does not appear to operate normally or
exhibits a marked change in performance; or
E. The appliance has been dropped, or the enclosure damaged.
16. Tilt/Stability - All televisions must comply with
recommended international global safety standards for tilt and
stability properties of its cabinets design.
• Do not compromise these design standards by applying
excessive pull force to the front, or top, of the cabinet
which could ultimately overturn the product.
• Also, do not endanger yourself, or children, by placing
electronic equipment/toys on the top of the cabinet. Such
items could unsuspectingly fall from the top of the set and
cause product damage and/or personal injury.
17. Wall or Ceiling Mounting - The appliance should be
mounted to a wall or ceiling only as recommended by the
manufacturer.
18. Power Lines - An outdoor antenna should be located away
from power lines.
19. Outdoor Antenna Grounding - If an outside antenna is
connected to the receiver, be sure the antenna system is
grounded so as to provide some protection against voltage
surges and built up static charges.
20. Objects and Liquid Entry - Care should be taken so that
objects do not fall and liquids are not spilled into the
enclosure through openings.
a) Warning:To reduce the risk of fire or electric shock, this
apparatus should not be exposed to rain or moisture and
objects filled with liquids, such as vases should not be placed
on this apparatus.
21. Battery Usage CAUTION - To prevent battery leakage
that may result in bodily injury, property damage, or damage
to the unit:
• Install all batteries correctly, with + and - alignment as
marked on the unit.
• Do not mix batteries (old and new or carbon and alkaline,
etc.)
• Remove batteries when the unit is not used for a long time.
IMPORTANT SAFETY INSTRUCTIONS
Read before operating equipment
Note to the CATV system installer: this reminder is provided to call the CATV system installer’s attention to Article 820-40
of the NEC that provides guidelines for proper grounding and, in particular, specifies that the cable ground shall be connected to
the grounding system of the building, as close to the point of cable entry as practical.
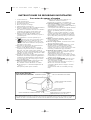
EXAMPLE OF ANTENNA GROUNDING AS PER
NATIONAL ELECTRICAL CODE (NEC)
GROUND CLAMP
ANTENNA LEAD IN WIRE
ANTENNA DISCHARGE UNIT
(
NEC SECTION 810-20)
GROUNDING CONDUCTORS
(NEC SECTION 810-21)
GROUND CLAMPS
POWER SERVICE GROUNDING ELECTRODE SYSTEM
(
NEC ART 250, PART H)
ELECTRIC SERVICE EQUIPMENT
2454.2 en 03-10-2005 14:33 Pagina 1

2454.2 en 03-10-2005 14:33 Pagina 2

1
English
EspañolPortuguês
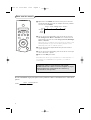
Every day User Guide
This Every day User Guide will help you to install your new TV set and to operate the basic functionalities.
More extended instructions on more special functions and features can be found on
the extended manual on the supplied CD.
Please, also follow the instructions and read the help texts which are being displayed at the bottom of the
screen on the specific menu items highlighted.
How to mount the supplied table stand or the wall mounting brackets, see the separate leaflets supplied.
Contents
Read this first ! . . . . . . . . . . . . . . . . . . . . . . . . . . . . . . . . . . . . . . . . . . . . . . . . . . . . . . . 2
Preparation . . . . . . . . . . . . . . . . . . . . . . . . . . . . . . . . . . . . . . . . . . . . . . . . . . . . . . . . . . 3
To use the menus . . . . . . . . . . . . . . . . . . . . . . . . . . . . . . . . . . . . . . . . . . . . . . . . . . . . . 4
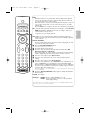
Use of the remote control RC4307 . . . . . . . . . . . . . . . . . . . . . . . . . . . . . . . . . . . . . . . 6
Buttons on the right side of the TV . . . . . . . . . . . . . . . . . . . . . . . . . . . . . . . . . . . . . . . 8
Connect Accessory Devices . . . . . . . . . . . . . . . . . . . . . . . . . . . . . . . . . . . . . . . . . . . . . 9
Recorder (vcr-dvd+rw) . . . . . . . . . . . . . . . . . . . . . . . . . . . . . . . . . . . . . . . . . . . . . . . . . . . . . 9
Recorder and other A/V devices . . . . . . . . . . . . . . . . . . . . . . . . . . . . . . . . . . . . . . . . . . . . . . 10
Recorder and cable box with RF output . . . . . . . . . . . . . . . . . . . . . . . . . . . . . . . . . . . . . . . . 11
Satellite Receiver / cable box with AV outputs . . . . . . . . . . . . . . . . . . . . . . . . . . . . . . . . . . . 12
Recorder and Satellite Receiver / cable box with AV outputs . . . . . . . . . . . . . . . . . . . . . . . . 13
DVD Player or other accessory digital source devices . . . . . . . . . . . . . . . . . . . . . . . . . . . . . 14
HDMI (High Definition Multimedia Interface) connectors . . . . . . . . . . . . . . . . . . . . . . . . . . . 15
Multi channel Surround receiver . . . . . . . . . . . . . . . . . . . . . . . . . . . . . . . . . . . . . . . . . . . . . . 16
Connect extra subwoofer . . . . . . . . . . . . . . . . . . . . . . . . . . . . . . . . . . . . . . . . . . . . . . . . . . .16
Side connections . . . . . . . . . . . . . . . . . . . . . . . . . . . . . . . . . . . . . . . . . . . . . . . . . . . . . 17
How to search for and store TV channels . . . . . . . . . . . . . . . . . . . . . . . . . . . . . . . . . 18
Select the menu language . . . . . . . . . . . . . . . . . . . . . . . . . . . . . . . . . . . . . . . . . . . . . . . . . . . 18
Store TV channels . . . . . . . . . . . . . . . . . . . . . . . . . . . . . . . . . . . . . . . . . . . . . . . . . . . . . . . . . 18
Audio- and video equipment buttons . . . . . . . . . . . . . . . . . . . . . . . . . . . . . . . . . . . . . 19
To select connected devices . . . . . . . . . . . . . . . . . . . . . . . . . . . . . . . . . . . . . . . . . . . . 19
Before Calling Service . . . . . . . . . . . . . . . . . . . . . . . . . . . . . . . . . . . . . . . . . . . . . . . . . 20
* NXT
®
is a trademark of New Transducers Limited
2454.2 en 03-10-2005 14:33 Pagina 1

2
Help?
If this instruction manual does not give an answer or if ‘Before Calling Service’ does not solve your TV problem,
you can call your Local Philips Customer or Service Centre. See the supplied World-wide guarantee booklet.
Please, have the Model and Product number which you can find at the back of your television set or on the
packaging, ready, before calling the Philips helpline 0800 701 0245.
Model: 32PF9630/78; 42PF9630/78; 50PF9630/78
Serial No: ...............................................
Care of the screen
Do not touch, push or rub or strike the screen with anything hard as this may scratch, mar or damage the
screen permanently. And please do not rub with dust clothes with chemical treatment.
Do not touch the surface with bare hands or greasy cloth (some cosmetics are detrimental to the screen).
Unplug the TV before cleaning the screen.
When the surface becomes dusty, please wipe gently with absorbent cotton or other soft materials like chamois
soaks. Do not use acetone, toluene and alcohol because they cause chemical damage. Do not use liquid
cleaners or aerosol cleaners. Wipe off saliva or water drops as soon as possible.Their long time contact with the
screen causes deformations and color fading..
Warning concerning stationary images on the TV screen
A characteristic of Plasma Display Panels is that displaying the same image for a long time can cause a
permanent after-image to remain on the screen.This is called phosphor burn in.
Normal use of the TV should involve the showing of pictures that contain constantly moving and changing
images that fill the screen.
How to dispose of batteries?
The batteries supplied do not contain the heavy metals mercury and cadmium. Nevertheless in many areas
batteries may not be disposed of with your household waste. Please ensure you dispose of batteries according
to local regulations.
R End of life directives
Philips is paying a lot of attention to producing environmentally-friendly in green focal areas.Your new TV
contains materials which can be recycled and reused. At the end of its life specialized companies can dismantle
the discarded TV to concentrate the reusable materials and to minimize the amount of materials to be disposed
of. Please ensure you dispose of your old TV according to local regulations.
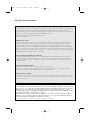
Read this first !
Plasma display characteristics
This Plasma display is designed to be used at altitudes up to 6562 ft above sea level (and/or local air
pressure equal or above 800 hPa). Operating this set at higher altitude (lower air pressure) is possible.
However, at high altitudes (or local air pressure equal or below 800 hPa) the picture on this display may
become unstable and picture performance can deteriorate. In addition, the plasma display may produce a
humming sound in these conditions.
These possible adverse effects relate to the altitude and are common of all plasma displays. Once the set
is brought below aprox 6562 ft (and/or local air pressure equal or above 800 hPa) its function will most
likely return to normal.
Note:Transportation at high altitudes has no negative effect on the set or picture performance.
VCR1
BBC2
CNN
Off
2454.2 en 03-10-2005 14:33 Pagina 2

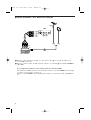
3
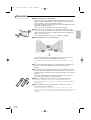
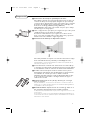
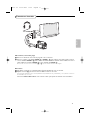
English
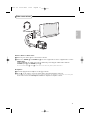
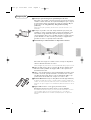
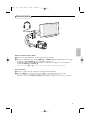
& Wall mounting instructions/Stand
How to mount the supplied stand and/or wall mount bracket, see the
supplied separate leaflet. Make sure that the wall mount is being fixed
securely enough so that it meets safety standards.
The weight of the TV (excl. packaging) is about 20 kg (32PF9630); 42 kg
(42PF9630); 58 Kg (50PF9630).
How to mount the supplied stand, see the separate leaflet.
é Make sure that air can circulate freely through the ventilation slots.
To prevent any unsafe situations, no naked flame sources, such as lighted
candles, should be placed in the vicinity.Avoid heat, direct sunlight and
exposure to rain or water.
The equipment shall not be exposed to dripping or splashing.
“ Infrared interference on external devices
To avoid bad infrared remote control reception, place your external
devices out of sight of the ambient lights of your TV set.
Note:Ambilight does not function well when the room temperature is less than
15°C.
‘ Insert the aerial plug firmly into the aerial socket x at the bottom of
the TV. For best picture quality use the suppressor-aerial cable
supplied.
( Insert the power plug supplied into the mains at the bottom of the TV
and in the wall socket. Refer to the back of the TV set for the correct
operation voltage. Consult your local dealer if your AC power supply is
different.
To prevent damaging the power (AC) cord which could cause a fire or
electric shock, do not place the TV on the cord.
§ Remote control: Insert the 2 batteries supplied (Type AA-1,5V).
The batteries supplied do not contain the heavy metals mercury and
cadmium. Please check on how to dispose of exhausted batteries according to
local regulations.
è Turn the TV on :Press the B button at the right side of the TV.
A blue led and the screen light on.
The blue LED blinks every time you press a button on the remote control.
When you turn on your set for the first time, the menu language automatically
appears on the screen. Alternately the explanation appears in different
languages.
Preparation
CR1
BC2
NN
Sunday
Monday
2454.2 en 03-10-2005 14:33 Pagina 3

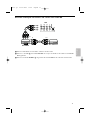
4
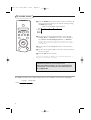
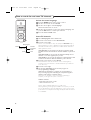
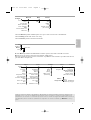
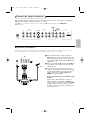
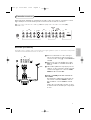
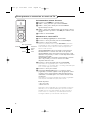
& Press the MENU button on the remote control to summon the
main menu.At any moment you can exit the menu by pressing
the
MENU button again.
é Use the cursor in the up/down direction to select the TV,
Settings, Demo or Install menu. Use the cursor left/right to
select
Picture, Sound, Ambilight, Features or Channels.
Note: Sometimes not all the menu items are visible on the screen
(indicated by a cluster of blue balls). Use the cursor down or right to
reveal all items.
“ Use the cursor in the left/right direction to select the menu
item.
‘ Use the cursor up/down again to select the control you want to
select or to adjust.
( Press the OK button to activate.
Note: Items temporary not available or not relevant are displayed in a
light grey colour and cannot be selected.
Press the
INFO
button on the remote control to get
information about the selected menu item.
More extended instructions on more special functions
and features can be found on the extended manual on
the supplied CD.
TV
Settings
Demo
Install
Picture Sound Ambilight Features Channels
The Install menu allows you to adjust settings related to the installation of TV channels and language.
Install
Language Autoprogram
To use the menus
MENU
++
CBLDVD/R TV VCR AUX
MENUPIP
Ò
®
‡π
º
†
®
®
®
®
INFO
POWER
TV CC
SCREEN
SURF
FORMAT
HD
SURR
SELECT
PIXEL PLUS
OK
2454.2 en 03-10-2005 14:33 Pagina 4

5
English
Picture Sound Ambilight Features Channels
Auto picture
Contrast
Brightness
Color
Sharpness
Color temperature
Digital processing
Dynamic contrast
DNR
Color enhancement
Tint
Picture format
TV
Auto sound
Equalizer
Volume
Balance
Headphone volume
Sound mode
(Alt audio)
(Mono/Stereo)
(3D surround effect)
Audio only
AVL
Delta volume
Ambilight
Brightness
Mode
(Color)
(Palette)
(Saturation)
Closed captions
Sleep Timer
Channel list
Channel lock
TV ratings lock
Movie ratings lock
Channel remove
(Antenna attenuator)
...
TV-Y
TV-Y7 (D) Dialogue
TV-PG (L) Language
....
TV ratings
lock
General Clock Source
Menu background
Surf
PIP format
Reset AV settings
Caption Service
OSD
Set/Change pin
Subwoofer
AV1
AV2
HDMI
Side
Center input
(Center In Vol.)
Time
Day
Settings
Auto demo
......
TV
Settings
Demo
Install
The Demo menu allows to demonstrate the TV features separately or in a continuously loop (Auto
demo).
Press one of the cursor buttons to stop the Auto demo. Select one of the features to run the feature
demo only once.
- The General menu allows you to change settings that will typically be accessed only occasionally.
- The
Clock menu allows you to use your TV as a clock.
- The
Source menu allows you to select a source.
Note: this Philips TV has been set at the factory to look best in bright store environments which typically use
florescent lighting.As your home will likely not be as well lit as a store, we recommend that you cycle through the
various Auto Picture modes to find the one that best suits your own viewing conditions. Most consumers will find
that
Natural is the correct choice.
2454.2 en 03-10-2005 14:33 Pagina 5

6
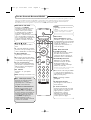
INFO Display information
Press to display (when available)
information about the selected TV
channel and program.
Menu/Remote control info
When a menu is on screen, press the
INFO button to display info on the
selected menu item.While the menu
info is displayed, press any button
(except
MENU or digit buttons) to
display remote control info.The
normal function of the button is not
executed.
Note: For most buttons pressing a button once will activate the function. Pressing a second time will de-activate it.
When a button enables multiple options, a small list will be shown. Press repeatedly to select the next item in the
list.The list will be removed automatically after 6 seconds or press
OK to remove immediately.
MENU
+
-
+
-
CBLDVD/R TV VCR AUX
MENU
MUTE
PIP
VOL CH
MODEON/OFF
Ambilight
123
456
789
0
Ò
®
‡π
º
†
®
®
®
®
INFO
POWER
TV CC
SCREEN
SURF
FORMAT
HD
SURR
SELECT
PIXEL PLUS
CONTROL
ACTIVE
CLOCKSAP
AV+
-
OK
POWER
Press to turn on/off the TV from or
to standby mode.
The TV is never powered off completely
unless it is physically unplugged.
PIXEL PLUS 2
Pixel Plus 2 demo on/off
In the right part of the screen
Pixel Plus 2 is turned on.
Keep the button pressed a bit
longer to set the different modes
for flicker reduction, motion
compensation and resolution
enhancement.
SURR Sound mode
Incredible surround
With stereo transmission, and
when Incredible surround is
selected, it seems as though the
loudspeakers are spread further
apart from one another.
Virtual Dolby Surround
Optimal with Dolby Surround
signals. Enables you to experience
the effect of Dolby Surround Pro
Logic, reproducing a rear sound
effect. See Sound menu, 3D
Surround effect.
Note:You can make the same
selection in the Sound menu, Sound
mode.
HD Press this button to use the
remote control directly in the
HD mode for HD devices (eg.
Set Top box).
MENU Main menu on/off.
CH
Channel selection
To browse through the TV
channels or sources stored.
0/9 Digit buttons
To select a TV channel.
For a two or three digit program
number, enter the second digit
before the dash disappears.To
switch immediately to a selected
one digit TV channel, keep the
digit button pressed a bit longer.
DVD/R CBL TV VCR AUX
Press the Select button
repeatedly to select one of the
system modes in which the
remote control can be used.
If no action is being undertaken
within 60 seconds, the remote
control returns to TV mode.
After an action in the selected
system mode the remote control
will remain in this mode for 60
seconds and will then return to
TV mode.
® º Ò ‡ π †
Audio and Video equipment
buttons.
TV For direct selection of antenna
input e.g. to easily swap between
the HD input and your TV
channels.
CC Closed Caption
On/Off/On during mute
OK Press this button to activate
your choice or to confirm when
in the menus.
PIP Dual screen/PIP/Multipip
Press this button repeatedly to
display the PIP format selected in
the Settings, General menu.
VOL Volume
Press + or - to adjust the
volume.
MUTE Interrupt the sound or
restore it.
Use of the remote control RC4307
2454.2 en 03-10-2005 14:33 Pagina 6

7
English
MENU
+
-
+
-
CBLDVD/R TV VCR AUX
MENU
MUTE
PIP
VOL CH
MODEON/OFF
Ambilight
123
456
789
0
Ò
®
‡π
º
†
®
®
®
®
INFO
POWER
TV CC
SCREEN
SURF
FORMAT
HD
SURR
SELECT
PIXEL PLUS
CONTROL
ACTIVE
CLOCKSAP
AV+
-
OK
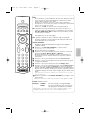
SURF
With this feature you can easily switch between different TV channels/
sources that currently interest you. In the Settings, General, Surf menu,
you can set surf to two- or nine-channel.
Press this button to select the previously viewed TV channel or source in
case of a Two channel surf, or to select the surf ring in case of a Nine
channel surf.
Press the
OK button or wait for the time out to dismiss the Surf display.
AV+ Keep this button pressed and then press repeatedly to select AV1, AV2,
HDMI (AV3), Side or TV when in TV mode, according to where you
connected the accessory devices.
-To type the dot (.) for digital channels.
SAP When you tune a channels where SAP (Second Audio Program) is
available, you can toggle between Main and sap. If not available only Main
can be selected.
ACTIVE CONTROL
The TV continuously measures and corrects all incoming signals in order
to provide the best picture possible.
& Press the ACTIVE CONTROL button.
Note:Turn off all menus on screen.
é The Active Control menu appears.
“ Press the cursor up/down to select the Active Control values Off,
Minimum, Medium or Maximum.
The picture settings are being optimized continuously and automatically
which is displayed by bars.Those menu items can not be selected.
‘ Press the cursor right to select Auto Picture.
( Press the cursor up/down to select one of the predefined picture
settings.
§ Press the cursor right to select Active Display.
è Press the cursor up/down to select Show bars, one of the Dual screen
demos or Off.When you select Dynamic contrast, Pixel Plus, Digital
Noise Reduction or Digital Natural Motion, the TV screen is divided into
two parts: in the left part the selected picture quality setting is switched
off; in the right part it is switched on.
Note: Dependent on the input signal, one or more Dual screen demos may
not be selectable.
! Press the ACTIVE CONTROL button again to switch off the Active
Control menu.
CLOCK Time display
Ambilight •
ON/OFF Press to switch Ambilight on or off.
•
MODE Press repeatedly to select one of the predefined
ambient light settings.
Note:When the TV is in standby mode, and you turn on Ambilight, Ambilight will be
active. Only then, less modes are available.
2454.2 en 03-10-2005 14:33 Pagina 7

8
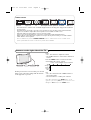
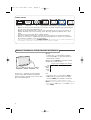
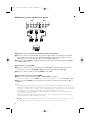
SCREEN FORMAT
Press this button to summon a list of available display formats for showing video images in the traditional
4:3 proportions.
Press this button repeatedly or press the cursor up/down to select another picture format:Automatic,
Super zoom, 4:3, Movie expand 14:9, Movie expand 16:9, 16:9 subtitle or Wide screen.
Automatic makes the picture fill the screen as much as possible.
Super zoom removes the black bars on the sides of 4:3 programs with minimal distortion.
When in Movie expand 14:9, Movie expand 16:9 or Super zoom picture format, you can make subtitles
visible with the cursor up/down.
Note: in HDMI mode press the SCREEN FORMAT button to switch between a 4:3 or a Wide screen
picture format. With HD sources not all screen formats will be available.
Automatic Super zoom 4:3 Movie expand 14:9 Movie expand 16:9 16:9 subtitle Wide screen
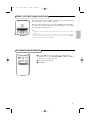
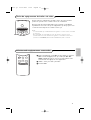
Should your remote be lost or broken you can still
change some of the basic settings with the buttons
on the right side of your TV.
Press:
• the - V + button to adjust the volume;
• the
- P/CH + button to select the TV channels or
sources.
Press the
MENU button to summon the main
menu without the remote control.
Use:
• the - V + button and the
- P/CH + button to
select menu items;
• the menu button to confirm your selection.
Note:When activated via the
MENU button on the
right side of the TV, only
Exit lets you remove the menu.
Navigate to
Exit and press the MENU button.
TV
Settings
Demo
Install
Exit
Picture Sound Ambilight Features Channels
MENU P/CHV
B
Buttons on the right side of the TV
2454.2 en 03-10-2005 14:33 Pagina 8

9
English
AV2
R
L
V
H
Y/G
CVBS S-VIDEO
Pr/R
Pb/B
75
ANT IN
CABLE
RECORDER
OUT IN
OUT
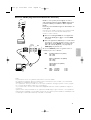
3
Note: Do not place your recorder too close to the screen as some recorders may be susceptible for signals from the
display. Keep a minimum distance of 20” from the screen.
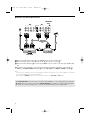
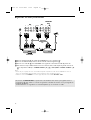
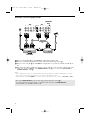
There is a wide range of audio and video devices that can be connected to your TV.The following
connection diagrams show you how to connect them to the TV.
AV1 can handle YPbPr,Y/C and CVBS (Y); AV2 YPbPr (RGB), CVBS and Y/C; HDMI (AV3) ; Side: CVBS and Y/C.
AUDIO
RECEIVER
MONITOR
OUT
AV1 AV3AV2
R
L
V
H
S-VIDEO
S-VIDEO
Y/G
CVBS
Pr/R
Pb/B
R
L
Pr
Pb
Y
VIDEO
R
L
R
L
CENTRE
SUBW.
R
L
HDMI
75
ANT IN
300
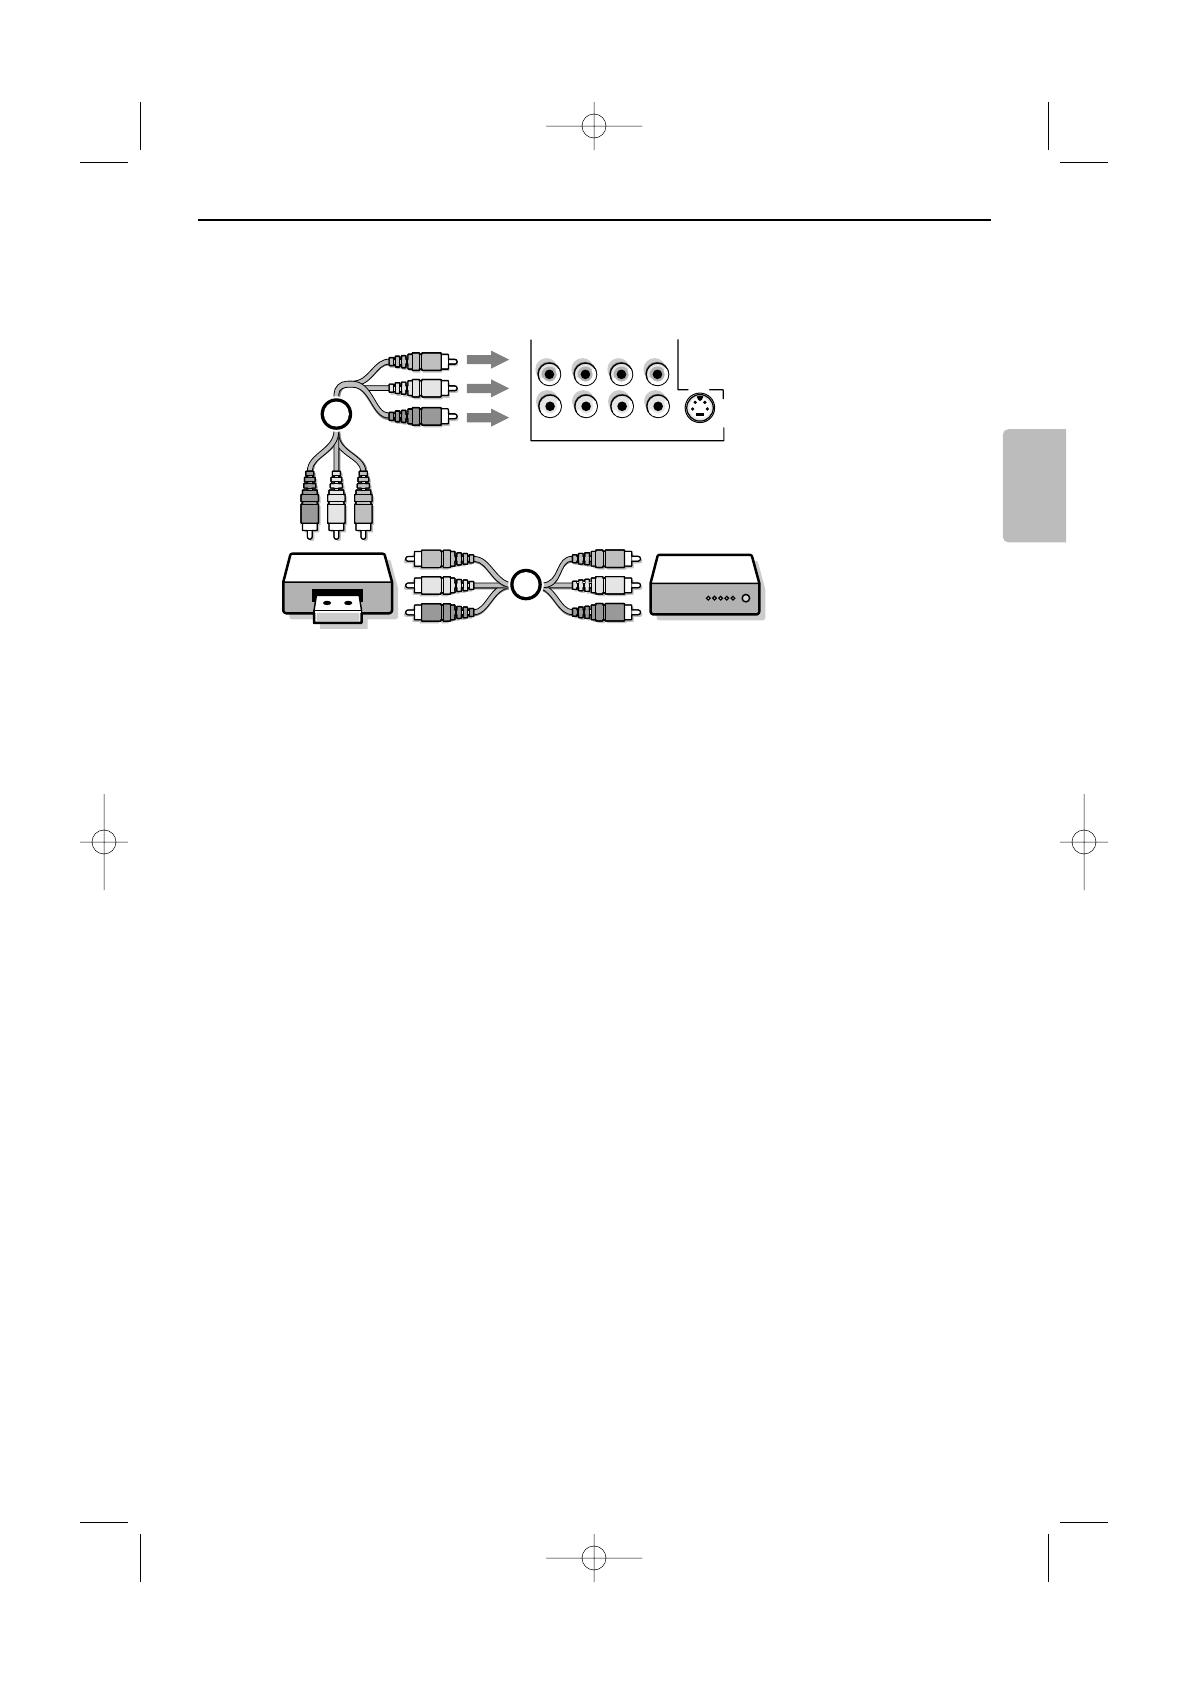
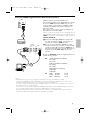
& Connect the RF Antenna or Cable TV cable
(eventually via an optional two-way signal splitter
and/or Cable TV converter box) 1 to the
RF
IN socket of your recorder.
é Connect another RF cable 2 from the output
OUT of your recorder to the TV’s input 75 ø
x jack.
“ Better playback quality can be obtained if you
also connect the Video,Audio Left and Right
(only for stereo devices) AV cables 3 to the
CVBS, AUDIO L and R input jacks of AV2.
If your recorder has an S-VHS video jack:
For improved picture quality, connect an S-video
cable with the
S-VIDEO input instead of
connecting the recorder to the
CVBS jack of
AV2.
S-Video does not provide audio, so audio cables
must still be connected to provide sound.
Recorder (VCR-DVD+RW)
Connect Accessory Devices
2454.2 en 03-10-2005 14:33 Pagina 9

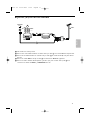
10
5 6
RECORDER
MONITOR
OUT
AV1AV2
S-VIDEO
S-VIDEO
R
L
Pr
Pb
Pr/R
Pb/B
V
H
Y/G Y
VIDEO
R
L CVBS
R
L
3
2
75
ANT IN
1
CABLE
4
OUT IN OUT IN
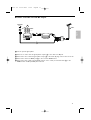
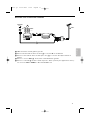
& Connect the RF antenna cable 1 of the RF IN socket of your other AV device.
é Connect the RF output of the AV device to the RF input of the recorder 2.
“ Connect another RF cable 4 from the output OUT of your recorder to the TV’s input 75 Ohm x
jack.
‘ To obtain better quality, also connect the Video,Audio left and Audio right cables of both devices to
AV1 (Y or S-VIDEO, AUDIO L and R,) 3 and to AV2 (CVBS or S-VIDEO, AUDIO L and R) 5.
Notes:
- In case of mono equipment, only the left loudspeaker reproduces sound. Use a mono to stereo adapter (not supplied)
for sound reproduction via all internal loudspeakers.
- When using the
S-VIDEO connector do not connect any device to the AV2 CVBS or AV1 Y input.
The
MONITOR OUT
connector can be used for a daisy chaining or to record programs from your TV
6. Only when a recorder is connected to
MONITOR OUT
it is possible to record an analog program
from your TV. See Record with your recorder in the extended manual on the supplied CD.
Recorder and other A/V devices
2454.2 en 03-10-2005 14:33 Pagina 10

11
English
CABLE
RECORDER
Cable Box
3
2
OUT
OUT IN OUT IN
75
SIGNAL
SPLITTER
ANTENNA
4
& Use an optional signal splitter.
é Connect one of the cable TV signal splitter outputs 1 to the cable box’s IN jack.
“ Connect the other cable TV signal splitter output 2 to the 75 Ω x plug on the bottom of the TV.
‘ Connect the cable box’s OUT jack 3 to the recorders RF IN socket.
( Connect the Video, Audio Left and Right (only for stereo sound) recorder AV cables 4 to the
CVBS, audio L and R input AV2 jacks on the TV.
Recorder and cable box with RF output
2454.2 en 03-10-2005 14:33 Pagina 11

12
AV1
S-VIDEO R
L
Pr
Pb
Y
SAT / Cable Box
IN
CABLE
OUT
VIDEO
L/Mono
R
2
& Connect the satellite antenna cable or the Cable TV cable 1 to the satellite receiver’s or cable box’s
IN jack.
é Connect the Video,Audio left and right AV cables 2 to the Y, L audio and R AUDIO input jacks of
AV1.
If your satellite receiver or cable box has an S-Video jack:
For improved picture quality, connect an S-Video cable to the
S-VIDEO input instead of connecting
the satellite receiver or cable box to the
Y jack.
Connect the audio cables to the device’s
AUDIO L and R jacks and to the L and R audio AV1 jacks
on the TV.
Satellite Receiver / cable box with AV outputs
2454.2 en 03-10-2005 14:33 Pagina 12
13
English
& Connect the RF Antenna or Cable TV cable as described above.
é Connect the AV cables 1 to the satellite receiver’s or cable box’s AV OUT jacks and to the
recorder’s
AV IN jacks.
“ Connect the recorder’s AV OUT jacks 2 to the TV’s AV2 jacks as described above.
AV2
R
L
V
H S-VIDEO
Y/G
CVBS
Pr/R
Pb/B
RECORDER
OUT
OUT
IN
VIDEO
L/Mono
R
2
1
OUT
SAT / Cable Box
Recorder and Satellite Receiver / cable box with AV outputs
2454.2 en 03-10-2005 14:33 Pagina 13

14
AV1AV2
R
L
V
H
S-VIDEO
S-VIDEO
Y/G
CVBS
Pr/R
Pb/B
R
L
Pr
Pb
Y
1 2
DVD / Cable Box
3
Devices with Component Video Output Connectors (YPbPr)
& Connect the three separate component video cables 1 to the device having component video
outputs (
YPbPr), such as DVD-players, laser-disc players, videogame players, satellite receivers or other
equipment, and to the
Y, Pb and Pr jacks of AV1 or AV2 on the TV.
é Connect the audio cable to device’s AUDIO L and R 2 jacks and to the L and R audio YPbPr jacks
of
AV1 or AV2.
Devices with RGB output
& Connect the device with RGB output with separate Horizontal and Vertical sync to the Pr/R Pb/B Y/G
input jacks 1 and to the H and V jacks of AV2 3.
é Connect the audio cables to the L and R AUDIO jacks of AV2.
Devices with an S-Video connector
& Connect an S-Video cable to the AV1 or AV2 S-VIDEO input.
Note:When using the
S-VIDEO connector do not connect any device to the AV2 CVBS or AV1 Y input.
é Connect the audio cables to the device’s AUDIO L and R jacks and to the L and R audio AV1 or AV2
jacks on the TV.
Notes
- The labels for the component video sockets may differ depending on the DVD player or the device connected.
Although the abbreviations may vary, the letters B and R stand for the blue and red component signals,
respectively, and Y indicates the luminance signal. Refer to the DVD player’s or devices instructions for use for
definitions and connection details.
- This television is designed to accept high definition signal standards 480p, 720p, 1080i and 1152i as specified by
the Electronic Industries Association standard EIA770.3.
Digital devices from different manufacturers have the possibility of differing output standards which may cause
difficulties for the television to properly display.
Warning: in case you notice scrolling images, wrong colors or no color, no picture, or even combinations of these
on your screen, check if the connections are done in the correct way or move your digital device further away from
your TV.
DVD Player or other accessory digital source devices
2454.2 en 03-10-2005 14:33 Pagina 14

15
English
HDMI
R
L
RECEIVER AV3
CENTRE
SUBW.
R
L
AUDIO
1
2
HDMI
R
L
AV3
1
Notes:
- Proper working is only guaranteed with HDMI compliant consumer products.
- Digital devices from different manufacturers have the possibility of differing output standards which may cause
difficulties for the television to properly display;
- If the set is cold, there may be a small “flicker” when the set is turned on.This is normal, there is nothing wrong
with the set.
- If possible, use the XGA 1024x768@60Hz video mode to obtain the best image quality for your monitor.
- In case no signal is detected from your HDMI device, turn off the HDMI device and then on again.
To get an optimal viewing, it is advised to turn your DVD player to one of the following TV display standards:
1920x1080i, 1280x720p, 720x480i or 720x480p.
HDMI is the leading new standard for Digital video and
audio interconnection.To the
HDMI connector you can
connect HDMI devices such as a Set Top Box or
compatible DVD-R or DVD player with HDMI, or DVI-
equipped devices like a computer.
So you can display high-definition pictures on this TV in
the digital form.
Note: If the accessory device has DVI output only, use a DVI
to HDMI adapter cable to connect to the
HDMI connector.
(Then also connect the audio cables to
AUDIO R and L.)
& Connect the digital HDMI output of your HD device
(e.g. PC, DVD player, Set Top Box..) 1 to the
HDMI
connector of your TV.
é In case a HD-DVI device (and if audio is present) is
connected also connect the audio cable 2 to the
AUDIO outputs of your HD device and to the R
(right) and L (left) HDMI (AV3) inputs of the panel
of the TV.
The
HDMI IN connector allows the following TV and
monitor display modes:
HD Standard Definition TV (SDTV)
640 x 480i
720 x 576i
Enhanced Definition TV (EDTV)
640 x 480p
720 x 576p
High Definition TV (HDTV)
1920x1080i
1280x720p
PC VGA 640x480 60 Hz
SVGA 800x600 60 Hz
XGA 1024x768 60 Hz
HDMI (High Definition Multimedia Interface) connectors
2454.2 en 03-10-2005 14:33 Pagina 15

16
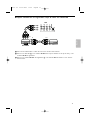
& Connect the audio cable to the multi channel Surround
receiver and to
AUDIO RECEIVER L and R next to the
CENTRE connector of your TV 1.
Note: turn off the TV and your surround receiver before
connecting them. Set the Surround receiver’s volume to
minimum.
é If you want the loudspeakers of your TV to act as center
speaker, also connect an audiocable to the multi channel
Surround receiver and to the
CENTRE connector of
your TV 2.
“ Select Center Input On in the Source menu.
The loudspeakers of the TV will now only produce
center sound, the loudspeakers connected to the audio
receiver will produce Surround Sound.The volume has
to be controlled via the multi channel Surround receiver.
Note: No sound will be heard when a TV channel or external
source is blocked via the Channel Lock menu.
AUDIO
RECEIVER
R
L
CENTRE
SUBW.
2
1
To enhance the sound reproduction of your TV you can
connect an externally powered subwoofer (between 20 and
250 Hz).
& Connect the audio cable of the external subwoofer to
the
SUBW. socket at the bottom of your TV.
é Select Subwoofer in the Settings, General menu.
“ Adjust the frequency of the external subwoofer to 100-
120 Hz (according to your personal preference) if
present on the subwoofer.
‘ Adjust the volume level of the external subwoofer,
presumed this control is present on the subwoofer.
See also the instruction manual of the external
subwoofer.
SUBWOOFER
AUDIO
RECEIVER
R
L
CENTRE
SUBW.
MONITOR
OUT
AV3
VIDEO
R
L
R
L
HDMI
Connect extra subwoofer
Multi channel Surround receiver
2454.2 en 03-10-2005 14:33 Pagina 16
A página está carregando...
A página está carregando...
A página está carregando...
A página está carregando...
A página está carregando...
A página está carregando...
A página está carregando...
A página está carregando...
A página está carregando...
A página está carregando...
A página está carregando...
A página está carregando...
A página está carregando...
A página está carregando...
A página está carregando...
A página está carregando...
A página está carregando...
A página está carregando...
A página está carregando...
A página está carregando...
A página está carregando...
A página está carregando...
A página está carregando...
A página está carregando...
A página está carregando...
A página está carregando...
A página está carregando...
A página está carregando...
A página está carregando...
A página está carregando...
A página está carregando...
A página está carregando...
A página está carregando...
A página está carregando...
A página está carregando...
A página está carregando...
A página está carregando...
A página está carregando...
A página está carregando...
A página está carregando...
A página está carregando...
A página está carregando...
A página está carregando...
A página está carregando...
A página está carregando...
A página está carregando...
A página está carregando...
A página está carregando...
A página está carregando...
A página está carregando...
A página está carregando...
A página está carregando...
A página está carregando...
A página está carregando...
A página está carregando...
A página está carregando...
-
 1
1
-
 2
2
-
 3
3
-
 4
4
-
 5
5
-
 6
6
-
 7
7
-
 8
8
-
 9
9
-
 10
10
-
 11
11
-
 12
12
-
 13
13
-
 14
14
-
 15
15
-
 16
16
-
 17
17
-
 18
18
-
 19
19
-
 20
20
-
 21
21
-
 22
22
-
 23
23
-
 24
24
-
 25
25
-
 26
26
-
 27
27
-
 28
28
-
 29
29
-
 30
30
-
 31
31
-
 32
32
-
 33
33
-
 34
34
-
 35
35
-
 36
36
-
 37
37
-
 38
38
-
 39
39
-
 40
40
-
 41
41
-
 42
42
-
 43
43
-
 44
44
-
 45
45
-
 46
46
-
 47
47
-
 48
48
-
 49
49
-
 50
50
-
 51
51
-
 52
52
-
 53
53
-
 54
54
-
 55
55
-
 56
56
-
 57
57
-
 58
58
-
 59
59
-
 60
60
-
 61
61
-
 62
62
-
 63
63
-
 64
64
-
 65
65
-
 66
66
-
 67
67
-
 68
68
-
 69
69
-
 70
70
-
 71
71
-
 72
72
-
 73
73
-
 74
74
-
 75
75
-
 76
76


Philips 42PF9630/78 Manual do usuário
- Categoria
- TVs LCD
- Tipo
- Manual do usuário
- Este manual também é adequado para
em outras línguas
- español: Philips 42PF9630/78 Manual de usuario
- English: Philips 42PF9630/78 User manual
Artigos relacionados
Outros documentos
-
AOC L47H861 Manual do proprietário
-
Nordmende 26 TFT LCD Manual do proprietário
-
LG RH1F99P1S Manual do usuário
-
LG RH277H-P1L Manual do usuário
-
Samsung LN40A650A1F Manual do usuário
-
-
-
-
-