Neomounts FPMA-DCB100DBLACK Manual do usuário
- Categoria
- Suportes de mesa de tela plana
- Tipo
- Manual do usuário

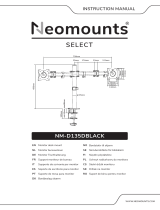
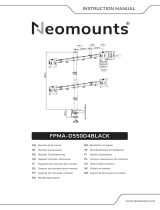
INSTRUCTION MANUAL
WWW.NEOMOUNTS.COM
FPMA-DCB100DBLACK
IT
EN
NL
DE
FR
ES
PT
DK
Monitor desk mount
Monitor bureausteun
Monitor Tischhalterung
Support moniteur de bureau
Supporto da scrivania per monitor
Soporte de escritorio para monitor
Suporte de mesa para monitor
Bordbeslag skærm
NO
SE
FI
PL
CS
SK
RO
Bordstativ til skjerm
Skrivbordsfäste för bildskärm
Näytön pöytäteline
Uchwyt nabiurkowy do monitora
Stolní držák monitoru
Držiak na monitor
Suport de birou pentru monitor
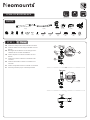
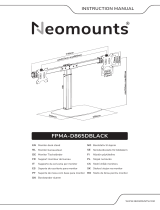
100mm
75mm
116mm
805mm
100mm
75mm
113mm
min10mm-max88mm
100mm
450mm

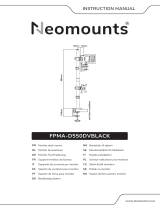
PARTS
FPMA-DCB100DBLACK
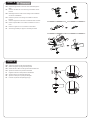
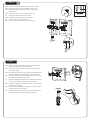
Mount the clamp to the rod and install to the desk
Monteer de klem aan de stang en installeer aan het
bureau
Befestigen Sie die Klemme an der Stange und in-
stallieren Sie sie auf dem Schreibtisch
Montez la pince sur la barre et installez-la sur le
bureau
Montare il morsetto sulla barra e installarlo sulla
scrivania
Monte la abrazadera en la barra e instálela en el
escritorio
Montar a braçadeira na barra e instalar na secretária
Zamontuj zacisk na pręcie i zainstaluj na biurku
EN
NL
DE
FR
IT
ES
PT
PL
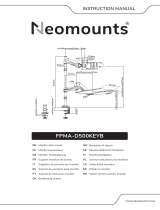
STEP 1 A
10-88mm
N
75x75 -
100x100 mm
0-45 cm
0-10 kg (2x)
A. (x1)
G. (x1) H. (x1) I. (x2) J. (x2) K. (x1) L. (x5) M. (x2)
B. (x2) C. (x1) D. (x1) E. (x1) F. (x2)
N. 3mm
(x1)
O. 4mm
(x1)
P. 6mm
(x1)
M-B. M5x12
(x8)
M-C. D5
(x8)
M-A. M4x12
(x8)
N
L
G
C
C
A
A
G
C
L
H
Clamp

10-88mm
G
K
A
L
Mount the grommet to the rod and install through the
desk
Monteer de doorvoer aan de stang en installeer in het
bureau
Befestigen Sie die Tülle an der Stange und installieren
Sie sie im Schreibtisch
Montez le passe-fil sur la tige et installez-le dans le
bureau
Montare il gommino sull'asta e installarlo nella scrivania
Monte el pasacables en la varilla e instálelo en el escri-
torio
Montar a argola na vara e instalar na secretária
Zamontuj przelotkę na pręcie i zainstaluj w biurku
EN
NL
DE
FR
IT
ES
PT
PL
STEP 1 B
Adjust the height to the desired position
Stel de hoogte in op de gewenste positie
Stellen Sie die Höhe auf die gewünschte Position ein
Ajuster la hauteur à la position souhaitée
Regolare l'altezza nella posizione desiderata
Ajuste la altura a la posición deseada
Ajustar a altura para a posição desejada
Ustawić wysokość do żądanej pozycji
EN
NL
DE
FR
IT
ES
PT
PL
STEP 2
N
C
C
D
L
A
G
H
K
N
N
N
Grommet

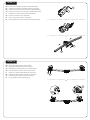
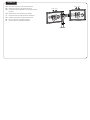
Connect the crossbars using the intermediate piece
Verbind de crossbars met behulp van het tussenstuk
Verbinden Sie die Querstangen mit dem Abstandshalter
Raccordez les barres transversales à l'aide de l'entretoise
Collegare le traverse utilizzando il distanziatore
Unir los travesaños con el separador
Ligar as travessas usando o espaçador
Połącz poprzeczki za pomocą elementu dystansowego
EN
NL
DE
FR
IT
ES
PT
PL
STEP 3
Attach the VESA plates to the crossbar
Bevestig de VESA-platen aan de crossbar
Befestigen der VESA-Platten an der Querstange
Fixez les plaques VESA à la barre transversale
Attaccare le piastre VESA alla barra trasversale
Coloque las placas VESA en la barra transversal
Prenda as placas VESA na barra transversal
Przymocuj płyty VESA do poprzeczki
EN
NL
DE
FR
IT
ES
PT
PL
STEP 4
B
O
O
F
F
J
M
O
B
O
E
O
O
E

Attach the crossbar to the pole and install the cable clips
Bevestig de crossbar aan de stang en bevestig de kabel-
clips
Befestigen der Querstrebe an der Stange und Installieren
des Kabel-Clips
Fixez la barre transversale à la tige et attachez les serre-
câbles
Attaccare la barra trasversale al palo e fissa la clip del cavo
Coloque la barra transversal a la varilla y coloque los clips
para cables
Anexe a barra transversal ao poste e instale o clip do cabo
Przymocuj belkę mocującą do słupa I przymocuj klipsy
kablowe
EN
NL
DE
FR
IT
ES
PT
PL
STEP 5
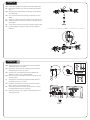
Tighten two screws in the back of the screen and keep
approximately 3 mm of space
Draai twee schroeven in de achterzijde van het scherm
en behoud plusminus 3 mm ruimte
Anziehen der zwei Schrauben auf der Rückseite des
Bildschirms und ca. 3 mm Abstand halten
Serrez les deux vis à l'arrière de l'écran et gardez environ
3 mm d'espace
Stringere due viti nella parte posteriore dello schermo e
mantenere circa 3 mm o spazio
Aprieta los dos tornillos en la parte posterior de la pan-
talla y conserva más espacio de 3 mm
Aperte dois parafusos na parte de trás da tela e manten-
ha aproximadamente 3 mm de espaço
Dokręć dwie śruby z tyłu ekranu i zachowaj około 3 mm
wolnej przestrzeni
EN
NL
DE
FR
IT
ES
PT
PL
STEP 6 A
O
* Not Included
II
O
3
1
3mm
2
M-C
M-A
M-B

Adjust the mount to the desired position and loosen or
tighten the adjustment knob if necessary
Stel de steun in op de gewenste positie en draai de stel-
knop indien nodig
Einstellen der Halterung in der gewünschten Position und
fixieren oder lockern des Drehknopfs wenn notwendig
Ajuster le support à la position désirée et desserrer ou ser-
rer le bouton de réglage si nécessaire
Regolare il supporto nella posizione desiderata e allentare
o serrare la manopola di regolazione se necessario
Coloque el soporte en la posición deseada y gire la perilla
de ajuste si es necesario
Ponha o suporte na posição desejada e afrouxe ou aperte
o botão de ajuste, se necessário
Dostosuj pozycję uchwytu do twoich wymagań i poluzuj
lub dokręć pokrętło regulacyjne, jeśli to konieczne
EN
NL
DE
FR
IT
ES
PT
PL
STEP 7
Attach the screens onto the bracket and secure them
Bevestig de schermen op de beugel en zet ze vast
Befestigen Sie die Bildschirme an der Halterung und
sichern Sie sie
Attachez les écrans sur le support et fixez-les
Fissare gli schermi sulla staffa e fissarli
Coloque las pantallas en el soporte y fíjelas
Fixar os ecrãs no suporte e fixá-los
Przymocuj ekrany do uchwytu i zabezpiecz je
EN
NL
DE
FR
IT
ES
PT
PL
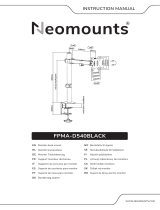
STEP 6 B
* Not Included
M-A
M-B
M-C
+45°
-45°
P
O
P
P
P
O

+15° -15°
+15° -15°
360°
360°
Move the screen into your desired position
Plaats het scherm in de gewenste stand
Positionierung des Bildschirms in der gewünschte
Position
Placez l'écran dans la position souhaitée
Sposta lo schermo nella posizione desiderata
Coloque la pantalla en la posición deseada
Mova a tela para a posição desejada
Przesuń ekran w pożądane położenie
EN
NL
DE
FR
IT
ES
PT
PL
STEP 8
360°
360°

-
 1
1
-
 2
2
-
 3
3
-
 4
4
-
 5
5
-
 6
6
-
 7
7
-
 8
8


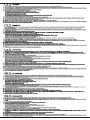
Neomounts FPMA-DCB100DBLACK Manual do usuário
- Categoria
- Suportes de mesa de tela plana
- Tipo
- Manual do usuário
em outras línguas
Artigos relacionados
-
 Neomounts NM-D335DBLACK Manual do usuário
-
 Neomounts NM-D135DBLACK Manual do usuário
-
Neomounts FPMA-D550DBLACK Manual do usuário
-
Neomounts FPMA-D850BLACK Manual do usuário
-
 Neomounts FPMA-D865DBLACK Manual do usuário
-
 Neomounts FPMA-D500KEYB Manual do usuário
-
 Neomounts FPMA-D540BLACK Manual do usuário
-
Neomounts FPMA-D550D3BLACK Manual do usuário
-
 Neomounts FPMA-D550D4BLACK Manual do usuário
-
 Neomounts FPMA-D550DVBLACK Manual do usuário


