A página está carregando...
PIXEL UP
40405 - 40425
Targa con unità elettronica Due Fili Plus audio e audio/video, display e tastiera alfanumerica
Panel with Due Fili Plus audio and audio/video electronic unit, display and alphanumeric keyboard
Platine avec unité électronique Deux Fils Plus audio et audio/vidéo, écran et clavier alphanumérique
Klingeltableau mit Audio- und Audio-/Video-Elektronikeinheit Due Fili Plus, Display und alphanumerischer Tastatur
Placa con unidad electrónica Due Fili Plus audio y audio/vídeo, pantalla y teclado alfanumérico
Botoneira com unidade eletrónica Due Fili Plus áudio e áudio/vídeo, display e teclado alfanumérico
Μπουτονιέρα με ηλεκτρονική μονάδα Due Fili Plus ήχου και ήχου/εικόνας, οθόνη και αλφαριθμητικό πληκτρολόγιο
Manuale utente - User Manual - Manuel de l’utilisateur
Bedienungsanleitung - Manual de usuario - Manual do utilizador
Εγχειρίδιο χρήστη
1. Descrizione
Posto esterno videocitofonico con chiamata da rubrica.
Il dispositivo è fornito di display e tastiera.
E’ possibile eettuare chiamate attraverso l’uso di una rubrica oppure inserire direttamente il numero dell’interno da contattare.
I nomi degli utenti possono essere cercati nella rubrica, usando dei ltri per lettera oppure attraverso la struttura dell’impianto.
Il display fornisce il feedback visivo delle fasi di funzionamento del posto esterno, come ad esempio le indicazioni di “chiamata in
corso” e “conversazione”, oltre a quello associato ai moduli di controllo varchi.
2
IT
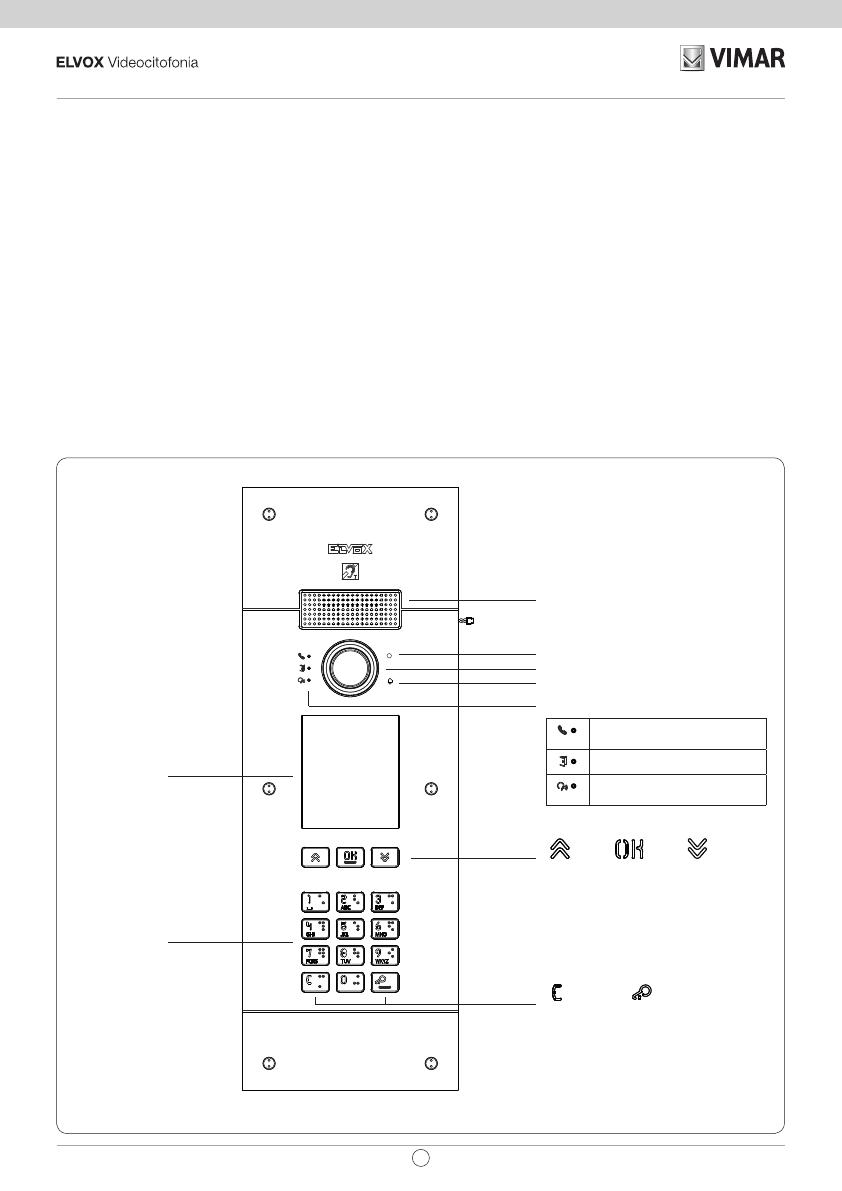
PIXEL UP: 40405 - 40425
Vista frontale
(UP), (OK), (DOWN)
Display 3,5”
Tastiera
Alfanumerica
Altoparlante
Microfono
Telecamera (solo 40405)
(Cancel), (Key)
LED per segnalazioni luminose:
Acceso: bus occupato / Lampeg-
giante: Mancata comunicazione
Porta aperta
Acceso: Comunicazione in corso /
Lampeggiante: Chiamata in corso
Sensore di Luminosità (solo 40425)

1.1 Caratteristiche
Il modulo audio e audio/video è dotato:
- interfacciamento verso gli apparecchi acustici usati da persone audiolese;
- sintesi vocale, per la segnalazione dello stato di chiamata;
- LED frontali per le segnalazioni dello stato di chiamata;
- funzione crepuscolare per la regolazione automatica dell’intensità dell’illuminazione in funzione della luce ambientale.
- funzione zoom & scan, che permette di zoomare e scorrere le zone inquadrate dalla camera (solo 40405);
- comando di serratura elettrica, collegabile direttamente ai morsetti S+ e S- o ai contatti supportati dai relè della tastiera;
- collegamento per un pulsante supplementare locale per l’apertura della serratura o per un sensore per la segnalazione di
“Porta aperta” (fare riferimento al manuale di programmazione);
Il modulo display è dotato di un menu di installazione da cui possono essere gestiti i parametri di congurazione base del posto
esterno. Possiede un LCD da 3.5” ha le seguenti caratteristiche: 320 x 480 pixel, 65K colori, 500 lux.
1.2 Funzione teleloop e sintesi vocale dei comandi
Il dispositivo permette alle persone con disabilità di ascoltare
l’audio della conversazione e le segnalazioni di stato della
chiamata tramite l’opportuna protesi acustica.
Abilitare l’apparecchio acustico, facendo riferimento al relativo
manuale di istruzioni.
30/40cm
30/40cm
1.3 Funzione zoom & scan (solo 40405)
La funzione permette di zoomare e scorrere le zone inquadrate
dalla camera, secondo quanto riportato nella gura seguente,
con i pulsanti di un posto interno. Usare l’OSD del posto interno
o i tasti F1/F2 per inquadrare i 5 campi a disposizione.
3
IT
PIXEL UP: 40405 - 40425

2. Utilizzo del modulo display
Il dispositivo in stand-by riporta le indicazioni da seguire per l’accesso alle funzionalità disponibili in base al tipo di installazione.
Attualmente sono disponibili tre diverse opzioni
per quanto riguarda lo stile della home page vi-
sualizzata in stand-by e la conseguente modalità
d’accesso alle funzionalità disponibili. E’ possibile
impostare la pagina desiderata tramite la sezione
“Navigazione” del menu di congurazione del di
-
splay.
In base alla programmazione della rubrica, la
schermata principale del modulo display riporta
la voce centralino, rubrica, e immissione codice
attuazione d’ingresso e ID da chiamare.
Le gure a lato mostrano la situazione di posto
esterno completamente congurato con tutte le
voci di cui sopra.
RICERCA
PER NOME
CHIAMATA
PER N°
APERTURA
CON CODICE
CHIAMATA A
CENTRALINO
Select
Interno
Interno
Esteso
Navigabile
Diretto
2.1. Chiamata da rubrica ad interno
Si accede al menù di
rubrica:
RICERCA
PER NOME
CHIAMATA
PER N°
APERTURA
CON CODICE
CHIAMATA A
CENTRALINO
RICERCA
PER NOME
CHIAMATA
PER N°
APERTURA
CON CODICE
CHIAMATA A
CENTRALINO
con centralino
senza centralino
Se esistono i preltri,
se ne percorre la
la sequenza e si
seleziona la voce della
rubrica da chiamare.
La pressione del
tasto OK cancella la
chiamata in corso.
Annulla
2.2 Ricerca di nome in rubrica
La ricerca di uno specico nome in rubrica avviene anche utilizzando la funzione multitap della tastiera.
Dalla lista dei nominativi della rubrica, premere nella tastiera le lettere
necessarie alla composizione del nome. Ogni tasto deve essere premuto
ripetutamente, no a quando non compare sul display la lettera desiderata.
Il nome in composizione viene visualizzato sulla parte alta del display.
In questo modo la visualizzazione viene aggiornata, puntando al primo nome
che soddisfa la ricerca. Selezionare quindi il nome desiderato e premere OK.
Cancellando il nome in composizione, con il tasto C, viene ripristina la
visualizzazione iniziale.
La funzione multitap è sempre attiva nelle schermate dove compare un
elenco di utenti.
4
IT
PIXEL UP: 40405 - 40425

2.3 Chiamata a Centralino
Per la chiamata ad un centralino, se congurato nella rubrica, è disponibile una voce rapida nel menu principale. Inoltre, eventuali
altri centralini sono accessibili come voci di rubrica.
2.4 Chiamata da tastiera
È possibile inserire direttamente il numero
dell’interno da chiamare.
Si inserisce l’interno seguendo le indicazioni
riportare sul display:
• “OK” invia la chiamata;
• “C” cancella l’inserimento.
RICERCA
PER NOME
CHIAMATA
PER N°
APERTURA
CON CODICE
CHIAMATA A
CENTRALINO
Se l’interno digitato non corrisponde ad un
numero valido,viene emesso l’avviso:
2.5 Informazioni di chiamata
Il dispositivo ritorna le
informazioni di stato
associate alla fase di
chiamata:
Annulla
Annulla
In Chiamata
In conversazione
Chiamata conclusa
Nessuna risposta
Se il sistema risulta
occupato da un’altra
chiamata, viene
visualizzato:
5
IT
PIXEL UP: 40405 - 40425

Se l’utente risulta
occupato oppure ha
impostato il servizio
di utente assente,
vengono emessi gli
avvisi:
2.6 Filtri della rubrica
Il software di congurazione da PC permette di abilitare una serie di ltri per l’accesso mirato a dei sottoinsiemi della rubrica.
I ltri sono illustrati di seguito.
2.6.1. Preltro iniziali
Il ltro permette di
accedere ad una
sezione della rubrica
individuata dai nomi
che iniziano con la
lettera scelta.
RICERCA
PER NOME
CHIAMATA
PER N°
APERTURA
CON CODICE
CHIAMATA A
CENTRALINO
A-B-C
D-E-F
G-H-I
J-K-L
M-N-O
2.6.2. Filtro Edicio
Il ltro permette
di accedere al
sottoinsieme degli
utenti associato ad uno
specico edicio.
RICERCA
PER NOME
CHIAMATA
PER N°
APERTURA
CON CODICE
CHIAMATA A
CENTRALINO
Tutti
Lybra
Il ltro Edicio può
essere combinato con
il preltro iniziali.
RICERCA
PER NOME
CHIAMATA
PER N°
APERTURA
CON CODICE
CHIAMATA A
CENTRALINO
Tutti
Lybra
A-B-C
D-E-F
G-H-I
J-K-L
M-N-O
6
IT
PIXEL UP: 40405 - 40425

2.6.3. Filtro Scala
Il ltro Scala permette
di accedere al sottoin-
sieme degli utenti as-
sociati ad una specica
scala o a tutti gli utenti.
Può essere combinato
con i due precedenti
ltri.
In particolare, con il l
-
tro edici si ottiene:
RICERCA
PER NOME
CHIAMATA
PER N°
APERTURA
CON CODICE
CHIAMATA A
CENTRALINO
Tutti
Lybra
Tutti
Scala A
Scala B
Scala C
Scala D
Con i ltro edici e iniziali:
RICERCA
PER NOME
CHIAMATA
PER N°
APERTURA
CON CODICE
CHIAMATA A
CENTRALINO
Tutti
Lybra
Tutti
Scala A
Scala B
Scala C
Scala D
A-B-C
D-E-F
G-H-I
J-K-L
M-N-O
2.7 Informazioni aggiuntive
Le informazioni aggiuntive vengono visualizzate su una voce della rubrica quando l’utente vi si soerma per più di 3 s.
In ordine di priorità:
• se è presente viene visualizzata l’Informazioni
Utente
• se non è presente una stringa nel campo In
-
formazioni, ma è presente nel campo Nome
Secondario allora viene visualizzata quest’ul-
tima;
• se non sono presenti stringhe né su Informa
-
zioni Utente né su Nome Secondario, e c’è un
altro utente con lo stesso Id allora viene visua-
lizzato il Nome di questo secondo utente;
RICERCA
PER NOME
CHIAMATA
PER N°
APERTURA
CON CODICE
CHIAMATA A
CENTRALINO
OK
OK
OK
7
IT
PIXEL UP: 40405 - 40425

3. Controllo varchi
Il display riporta il feedback del funzionamento della modalità di controllo accessi.
Questa modalità permette di attivare un comando precedentemente congurato (es. serratura, relè, ecc.).
Tasto (Cancel) Tasto (Key)
Premendo il tasto il display entra in modalità “Inserimento codice”.
Ad ogni pressione di un tasto cifra, il display visualizza la cifra per un breve intervallo di tempo sovrascrivendola poi con un asterisco.
Il codice inserito viene confermato premendo ancora
.
Il tasto
è utilizzato per cancellare le eventuali cifre inserite oppure se non sono presenti cifre per tornare alla home page.
Il dispositivo ritorna le
informazioni di stato
associate alla fase di
controllo varchi:
Accesso alla modalità
Controllo varchi
Inserimento codice
Attesa conferma
A valle dell’inserimento
di un codice si ottengo
-
no le due segnalazioni
a seconda dell’esito
dell’operazione.
Nel caso il codice cor
-
risponda all’attivazione
della serratura della
targa locale viene vi
-
sualizzata l’icona porta
aperta invece che ese
-
guito.
Porta Aperta
Eseguita
Non eseguita
Porta aperta
8
IT
PIXEL UP: 40405 - 40425

4. Messaggi di notica
La seguente schermata si presenta nella fase
di avvio del dispositivo e richiede l’attesa per il
completamento della fase di avvio. Attendere il
completamento. Se sono presenti altri messaggi
in modo persistente rivolgersi all’installatore.
Avvio
5. Congurazione
Fare riferimento al manuale di programmazione di PIXEL UP.
9
IT
PIXEL UP: 40405 - 40425
Regole di installazione
L’installazione deve essere eettuata da personale qualicato con l’osservanza delle disposizioni regolanti l’installazione del
materiale elettrico in vigore nel paese dove i prodotti sono installati.
Conformità normativa
Direttiva EMC
Norme EN 60065, EN 61000-6-1 e EN 61000-6-3.
Regolamento REACh (UE) n. 1907/2006 – art.33. Il prodotto potrebbe contenere tracce di piombo.
Il manuale istruzioni è scaricabile dal sito www.vimar.com
RAEE - Informazione agli utilizzatori
Il simbolo del cassonetto barrato riportato sull’apparecchiatura o sulla sua confezione indica che il prodotto alla
ne della propria vita utile deve essere raccolto separatamente dagli altri riuti. L’utente dovrà, pertanto, conferire
l’apparecchiatura giunta a ne vita agli idonei centri comunali di raccolta dierenziata dei riuti elettrotecnici ed
elettronici. In alternativa alla gestione autonoma, è possibile consegnare gratuitamente l’apparecchiatura che si desidera
smaltire al distributore, al momento dell’acquisto di una nuova apparecchiatura di tipo equivalente. Presso i distributori di
prodotti elettronici con supercie di vendita di almeno 400 m
2
è inoltre possibile consegnare gratuitamente, senza obbligo
di acquisto, i prodotti elettronici da smaltire con dimensioni inferiori a 25 cm. L’adeguata raccolta dierenziata per l’avvio
successivo dell’apparecchiatura dismessa al riciclaggio, al trattamento e allo smaltimento ambientalmente compatibile
contribuisce ad evitare possibili eetti negativi sull’ambiente e sulla salute e favorisce il reimpiego e/o riciclo dei materiali di cui
è composta l’apparecchiatura.

1. Description
Outdoor video entryphone unit with call from contacts list.
The device is equipped with a display and keyboard.
Calls can be made using a contacts list or by entering the extension number to call directly.
The user names can be searched in the contacts list, using the lters by letter or via the system structure.
The display provides visual feedback on the operating phases of the outdoor unit, such as the indications for "call in progress" and
"talking", in addition to that associated with the entry control modules.
Front view
(UP), (OK), (DOWN)
3.5” display
Alphanumeric
keyboard
Speaker
Microphone
Video camera (only 40405)
(Cancel), (Key)
LED for light signals:
On: bus busy / Flashing: No
communication
Door open
On: Communication in progress /
Flashing: Call in progress
Brightness sensor (only 40425)
10
EN
PIXEL UP: 40405 - 40425

1.1 Features
The audio and audio/video module is equipped with:
- interfacing to acoustic devices used by the hard-of-hearing;
- voice synthesis, for signalling the call state;
- Front LEDs, for signalling the call state;
- light sensor function for automatically adjusting the brightness according to the ambient light.
- zoom & scan function, used to zoom in an scan the areas shown by the camera (only 40405);
- electric lock command, connected directly to the terminals S+ and S- or to the contacts supported by the keyboard relays;
- connection for an additional local push button to open the lock or for a “Door open” signalling sensor (refer to the programming
manual);
The display module is equipped with an installation menu with which the basic speech unit conguration parameters can be
managed. With 3.5" LCD display, with the following features: 320 x 480 pixels, 65K colours, 500 lux.
1.2 Teleloop and control speech synthesis function
The device allows persons with disabilities to listen to the call
audio and receive call status signals via an appropriate hearing
aid.
Enable the hearing aid, referring to its instruction manual.
30/40cm
30/40cm
1.3 Zoom & Scan function (only 40405)
This function lets you zoom and scroll through the areas framed
by the camera, as shown in the following gure, with the buttons
of an indoor unit. Use the internal unit OSD or keys F1/F2 to
focus on the 5 elds available.
11
EN
PIXEL UP: 40405 - 40425

2. Using the display module
In standby mode the device gives the instructions to follow to access the available features depending on the type of installation.
Currently three options are available for the style
of the home page displayed in stand-by and the
consequent methods of accessing the available
functions. The required page can be set in the
“Navigation” section of the display conguration
menu.
Depending on the programming of the contacts
list, the main screen of the display module will
show the following items: switchboard, contacts
list, entry actuator code and ID to call.
The gures opposite show a completely cong
-
ured outdoor station with all the items listed above.
SEARCH BY
NAME
CALL BY No
OPEN WITH
CODE
PORTER
Select
Contacts
Porter
Internal
Porter
Contacts
Internal
Extended
Navigable
Direct
2.1. Calling from the contacts list to an extension
Go to the contacts list
menu:
SEARCH BY
NAME
CALL BY No
OPEN WITH
CODE
PORTER
Select
Contacts
Porter
Contacts
Press
SEARCH BY
NAME
CALL BY No
OPEN WITH
CODE
PORTER
with switchboard
without switchboard
If pre-lters exist, scroll
through the sequence
and select the item in
the contacts list to call.
Press OK to cancel the
current call.
Users
Cancel
2.2 Searching for a name in the contacts list
You can search for a specic name in the contacts list also by using the multi tap function of the keypad.
From the list of names in the contacts list, press the letters forming the name
on the keypad. Each button must be pressed repeatedly until the desired
letter appears on the display.
The name being formed appears at the top of the display.
In this way the display is refreshed, indicating the rst name that satises the
search. Then select the desired name and press OK.
Clearing the name being formed, with button C, restores the initial view.
The multitap function is always active in the screens where a list of users
appears.
12
EN
PIXEL UP: 40405 - 40425

2.3 Calling a Switchboard
To call a switchboard, if congured in the contacts list, there is a quick item in the main menu. In addition, any other switchboards
are accessible as contacts list items.
2.4 Call from keyboard
You can directly enter the extension number you
want to call.
Enter the extension number by following the
indications on the display:
• “OK” sends the call;
• “C” clears the entry.
SEARCH BY
NAME
CALL BY No
OPEN WITH
CODE
PORTER
Internal
Contacts
Porter
Internal
Delete
Confirm
If the extension keyed in does not match a valid
number, a warning is issued:
Invalid
2.5 Call information
The device returns
the status information
associated with the call
phase:
Cancel
Cancel
Ended
Porter
No reply
Calling
Talking
Call ended
No answer
If the system is busy
with another call, the
following is shown:
Busy
13
EN
PIXEL UP: 40405 - 40425

If the user is busy or
has set the user absent
service, these warnings
are issued:
Busy
Absent
2.6 Contacts list lters
PC conguration software is used to enable a set of lters for targeted access to the sub-sets of the contacts list.
The lters are described below.
2.6.1. Initials pre-lter
This lter lets you
access a section of the
contacts list identied
by the names that start
with the chosen letter.
SEARCH BY
NAME
CALL BY No
OPEN WITH
CODE
PORTER
A-B-C
D-E-F
G-H-I
J-K-L
M-N-O
Users
Users
2.6.2. Building lter
This lter lets you
access the subset of
users paired with a
specic building.
SEARCH BY
NAME
CALL BY No
OPEN WITH
CODE
PORTER
All
Lybra
Buildings
Users
The Building lter can
be combined with the
initials pre-lter.
SEARCH BY
NAME
CALL BY No
OPEN WITH
CODE
PORTER
All
Lybra
Buildings
A-B-C
D-E-F
G-H-I
J-K-L
M-N-O
Users
Users
14
EN
PIXEL UP: 40405 - 40425

2.6.3. Stair lter
The Stair lter lets
you access the subset
of users paired with
a specic stair or all
users.
It can be combined with
the two previous lters.
In particular, with the
buildings lter you
obtain:
SEARCH BY
NAME
CALL BY No
OPEN WITH
CODE
PORTER
All
Lybra
Buildings
All
Stair A
Stair B
Stair C
Stairs
Users
Stair A
With the buildings and initials lter:
SEARCH BY
NAME
CALL BY No
OPEN WITH
CODE
PORTER
All
Lybra
Buildings
All
Stair A
Stair B
Stair C
Stairs
A-B-C
D-E-F
G-H-I
J-K-L
M-N-O
Users
Stair A
Users
Stair A
2.7 Additional information
Additional information is displayed on a contacts list entry when the user hovers over it for more than 3 s.
In order of priority:
• if present, the User Information is displayed
• if there is no string in the Information eld, but
there is one in the Secondary Name eld, then
the latter is displayed;
• if there are no strings in either User Informa
-
tion or Secondary Name, and there is another
user with the same ID then the name of this
second user is displayed;
SEARCH BY
NAME
CALL BY No
OPEN WITH
CODE
PORTER
OK
Users
Back
OK
OK
OK
OK
Users
Back
OK
15
EN
PIXEL UP: 40405 - 40425

3. Entry control
The display gives feedback on the access control mode operation.
This mode is used to activate a previously congured command (e.g. lock, relay, etc.).
(Cancel) key (Key) key
Press the button and the display to go into “Code Entry” mode.
Each time a digit button is pressed, the display will show the digit for a short time and then overwrite it with an asterisk.
The code entered is conrmed by pressing
again.
The
key is used to cancel any digits entered or if no digits have been entered, to return to the home page.
The device returns
the status information
associated with the
entry control phase:
Code
Delete
Confirm
Code
Delete
Confirm
Code
Delete
Confirm
Access to the mode
for Entry control
Entering code
Waiting for
conrmation
After entering a code
two signals appear,
depending on the result
of the operation.
If the code corresponds
to the lock activation
of the local entrance
panel, the door open
icon is displayed
instead of the
completed icon.
Done
Wrong Code
Door Opened
Done
Not completed
Door Opened
16
EN
PIXEL UP: 40405 - 40425

4. Notication messages
The following screen appears in the device start-
up phase and the user must wait for the start-up
phase to complete. Wait for the phase to complete.
If other messages persist, contact the installer.
Loading...
Starting
5. Conguration
Refer to the PIXEL UP programming manual.
17
EN
PIXEL UP: 40405 - 40425
Installation rules
Installation should be carried out by qualied personnel in compliance with the current regulations regarding the installation of
electrical equipment in the country where the products are installed.
Conformity
EMC directive
Standards EN 60065, EN 61000-6-1 and EN 61000-6-3.
REACH (EU) Regulation no. 1907/2006 – Art.33. The product may contain traces of lead.
The instruction manual is downloadable from the site www.vimar.com
WEEE - Information for users
If the crossed-out bin symbol appears on the equipment or packaging, this means the product must not be included
with other general waste at the end of its working life. The user must take the worn product to a sorted waste center,
or return it to the retailer when purchasing a new one. Products for disposal can be consigned free of charge (without
any new purchase obligation) to retailers with a sales area of at least 400m
2
, if they measure less than 25cm. An ecient
sorted waste collection for the environmentally friendly disposal of the used device, or its subsequent recycling, helps avoid
the potential negative eects on the environment and people’s health, and encourages the re-use and/or recycling of the
construction materials.

1. Description
Poste extérieur visiophonique avec appel à partir du répertoire.
Le dispositif comprend un écran et un clavier.
Possibilité d'appeler à travers l'utilisation du répertoire ou en saisissant directement le numéro du poste intérieur à contacter.
Possibilité de rechercher le nom des usagers dans le répertoire à travers des ltres par lettre ou à travers la structure de l'installation.
Le dispositif fournit le suivi visuel des phases de fonctionnement du poste extérieur - par exemple les indications d' « appels en cours
» et de « conversation » - outre celui concernant les modules de contrôle des accès.
18
FR
PIXEL UP: 40405 - 40425
Vue de face
(UP), (OK), (DOWN)
Écran 3,5
pouces
Clavier
alphanumérique
Haut-parleur
Micro
Caméra (40405 uniquement)
(Cancel), (Key)
Led pour signalisations lumineuses :
Accès : bus occupé / Clignotante :
Absence de communication
Porte ouverte
Allumée : Communication en
cours / Clignotante : Appel en
cours
Capteur de luminosité
(40425 uniquement)

1.1 Caractéristiques
Le module audio et audio/vidéo est doté des éléments suivants :
- interfaçage vers les prothèses auditives des malentendants ;
- synthèse vocale, signalant l'état de l'appel ;
- leds frontales signalant l'état de l'appel ;
- fonction crépusculaire pour le réglage automatique de l’intensité de l'éclairage en fonction de la lumière ambiante.
- fonction zoom & scan qui permet d'agrandir et de parcourir les zones lmées par la caméra (40405 uniquement) ;
- commande de gâche électrique à connecter directement aux bornes S+ et S- ou aux contacts supportés par les relais du
clavier ;
- connexion pour un bouton supplémentaire local pour l'ouverture de la gâche ou pour un capteur de signalisation de « Porte
ouverte » (consulter le manuel de programmation) ;
Le module acheur dispose d'un menu d'installation permettant de gérer les paramètres de conguration de base du poste extérieur.
Comprend un écran LCD 3,5 pouces présentant les caractéristiques suivantes : 320 x 480 pixels, 65K couleurs, 500 lux.
1.2 Fonction téléboucle et synthèse vocale des commandes
Le dispositif permet aux malentendants d'écouter la
conversation et les signalisations d'état de l'appel à travers une
prothèse auditive spéciale.
Valider le fonctionnement de l'appareil acoustique en se
reportant au mode d'emploi de ce dernier.
30/40cm
30/40cm
1.3 Fonction zoom & scan (40405 uniquement)
La fonction permet d'agrandir et de faire déler les zones
cadrées par la caméra, comme le montre la gure ci-après, avec
les boutons d'un poste intérieur. Utiliser l’OSD du poste intérieur
ou les touches F1/F2 pour cadrer les 5 champs à disposition.
19
FR
PIXEL UP: 40405 - 40425

2. Utilisation du module écran
Le dispositif en état de veille explique la procédure à suivre pour accéder aux fonctions disponibles en fonction du type d'installation.
Trois options sont disponibles actuellement pour
le style de la page d'accueil achée en mode
veille et le mode d'accès aux fonctions disponibles
correspondant. Il est possible de programmer la
page choisie à partir de la section « Navigation »
du menu de conguration de l'écran.
La page principale de l’écran visualisera le stan
-
dard, le répertoire, la saisie du code de validation
d’accès et l’ID à appeler en fonction de la façon
dont aura été programmé le répertoire.
Les gures ci-contre illustrent la situation d’un
poste extérieur entièrement conguré avec toutes
les rubriques citées ci-dessus.
Sélection
Agenda
Portier
Select
Interne
Portier
Agenda
Interne
Élargie
Navigable
Directe
2.1. Appel à un poste intérieur à partir du répertoire
Accéder au menu du
répertoire :
Sélection
Agenda
Portier
Agenda
Appuyer
avec standard
sans standard
En présence de
pré-ltres, parcourir
leur séquence et
sélectionner la rubrique
du répertoire à appeler.
Appuyer sur la touche
OK pour eacer l'appel
en cours.
Usagers
Annuler
2.2 Rechercher un nom dans le répertoire
Pour rechercher un nom dans le répertoire, il est également possible d'utiliser la fonction multi tap du clavier.
Taper au clavier les lettres servant à composer le nom à partir de la liste des
noms du répertoire. Appuyer plusieurs fois sur chaque touche jusqu'à ce que
la lettre choisie s'ache.
Le nom s'ache en haut de l'écran.
Pointer le curseur sur le premier nom qui correspond à celui recherché pour
l'acher. Sélectionner le nom choisi et appuyer sur OK.
En eaçant le nom en phase de composition en appuyant sur la touche C, on
retourne à la page initiale.
La fonction multi tap est toujours active sur les pages présentant une liste
d'usagers.
20
FR
PIXEL UP: 40405 - 40425
1/60