Samsung RW13EBSS Manual do usuário
- Categoria
- Refrigeradores de vinho
- Tipo
- Manual do usuário

Modelo
RW13EBBB
RW13EBSS
MANUAL DE INSTRUÇÕES
PORTUGUÊS
Frigorífico Samsung para vinhos
Este produto está sujeito a alterações sem prévio aviso.
Leia atentamente este manual antes de ligar o
aparelho à energia e guarde-o com cuidado para
consultas futuras.
Registe o seu produto e participe das nossas promoções no site:
www.samsung.com/global/register
Samsung Wine Refrigerator
Model RW13EBBB
RW13EBSS
ENGLISH
Please read this manual carefullybefore switching on the power and
nicely keep it for future reference.
The product is subject to change without notice.
DA68-01509B(3)
Register your product at www.samsung.com/global/register
INSTRUCTION MANUAL
Free Standing Appliance
Aparelho Não Encastrável

1
ÍNDICE
Segurança........................................2
Nomes das peças..............................2
Observações acerca da utilização ....3
Painel de controlo.............................5
Manutenção e limpeza.......................7
Instalação.........................................8
Resolução de problemas...................9
Leia este manual atentamente antes de utilizar o frigorífico.
Leia atentamente as informações relativas à segurança antes
de utilizar o frigorífico.
Guarde este manual em um local de fácil acesso para futura
referência.
Contents
Please read this manual carefully before
using the refrigerator.
Please read carefully the contents concer
-ning safety before using the refrigerator.
Please keep this manual in a readily acces
-sible place for future reference.
Safety..............................................2
Name of parts..................................2
Notes concerning operation ...........3
Control panel..................................5
Set up..............................................8
Troubleshooting........................9
Maintenance &cleaning....................7
1

2
5 1 1 1
RW13EBBB
RW13EBSS
SEGURANÇA
Leia este manual.
Leia atentamente o conteúdo deste manual referente à segurança e utilização
antes de ligar o aparelho à energia.
Guarde este manual.
Guarde este manual com cuidado para futuras consultas.
Fique atento aos avisos.
Preste atenção aos avisos localizados no frigorífico relativos à utilização e siga
as respectivas instruções.
Siga as instruções neste manual relativas à utilização.
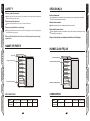
NOMES DAS PEÇAS
Estrutura superior
Prateleira metálica maior
Prateleira metálica menor
ACESSÓRIOS
Modelo
Nome
Prateleira metálica
maior
Prateleira metálica
menor
Tampa da lâmpada Lâmpada interna
Segurança
Nomes das peças
Observações acerca
da utilização
Painel de controlo
Manutenção e
limpeza
Instalação
Resolução de
problemas
Troubleshooting
2
NAME OF PARTS
Please read this manual.
Please read carefully the contents in this manual concerning safety and operation
before switching on the power.
Please keep this manual.
Please keep this manual nicely for your future reference.
Please pay attention to warnings.
Please pay attention to the warnings on the wine refrigerator concerning operation
and follow their instructions.
Please follow the instructions in this manual concerning
operation.
SAFETY
Top frame
Large steel wire rack
Small steel wire rack
Accessories
Safety
Name of parts
Notes concerning
operation
Control panel
Maintenance
&cleaning
Set up
5 1 1 1
Model
Name
Large steel wire Rack
RW13EBBB
RW13EBSS
Small steel wire rack
Lamp Cover
Internal lamp

3
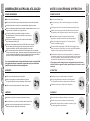
OBSERVAÇÕES ACERCA DA UTILIZAÇÃO
FONTE DE ENERGIA
Não utilize fichas danificadas.
Não puxe a ficha. Não toque a ficha quando estiver com as mãos molhadas.
A ficha não deverá ser dobrada ou pressionada sob objectos pesados.
Remova a ficha da tomada durante trovoadas e tempestades de raios, ou se o
frigorífico não for utilizado por longos períodos.
O frigorífico não deverá partilhar a tomada com outros
electrodomésticos. Do contrário, poderão ocorrer choques
eléctricos e incêndio.
Verifique se a voltagem do frigorífico está em conformidade
com a tomada antes de ligá-lo.
O intervalo de voltagem admissível é de 220-240V. Se a voltagem
da fonte de energia não estiver dentro desse intervalo, utilize um
regulador automático de 500W, de fácil aquisição no mercado.
Não é recomendável utilizar extensões de fios de alta tensão. Se pretender
utilizar uma placa de ligação, deverá ser semelhante à capacidade do frigorífico
e estar aterrada adequadamente. A placa de ligação deverá ser pendurada ou
posta em um local a mais de 200 mm de distância do frigorífico.
Se o cabo de alimentação estiver danificado, deverá ser substituído
por algum fabricante, revendedor, agente de serviço ou indivíduo
qualificado para evitar situações perigosas.
ATENÇÃO
Não coloque as mãos embaixo do frigorífico.
Não coloque cigarros ou velas embaixo do frigorífico.
O frigorífico deverá ficar longe de qualquer fonte de calor.
Não coloque objectos pesados em cima do frigorífico.
LIMPEZA
Não limpe o frigorífico com água ou produtos químicos.
Se a ficha estiver suja, utilize-a somente depois que a limpar.
Aguarde cinco minutos quando desejar inserir a ficha na
tomada novamente, depois de a ter removido.
Segurança
Nomes das peças
Observações acerca
da utilização
Painel de controlo
Manutenção e
limpeza
Instalação
Resolução de
problemas
NOTES CONCERNING OPERATION
Do not use a damaged plug.
Do not pull the plug. Do not touch the plug when your hands are
wet.
The plug should not be over-bent or pressed under a heavy thing.
Please remove the plug from the outlet when there are thunders
and lightning or the refrigerator is not to be used for a long time.
The refrigerator should not share the outlet with other
appliances, otherwise electric shock and fire may happen.
Check the voltage of refrigerator if it is in conformity with
that of outlet before plugging.
The permissible voltage range is 220-240V. If the voltage of your
power source is not in this range, you have to use a 500W automatic
regulator, which can easily be found on the market.
The extension of power line is not recommended. If you want to use
a connection plate, it should be in line with the capacity of refrigerator
and nicely grounded. The connection plate should be hung up or put
at a place more than 200mm far from the refrigerator.
Please do not put your hands under the refrigerator.
Do not put cigarette butts or candles on the refrigerator.
The refrigerator should be far away from any heat source.
Please do not put heavy things on the refrigerator.
Do not clean the refrigerator with water or chemicals.
If there is dirt on the plug, please use it after cleaning.
Please wait 5 minutes when you want to insert the plug into
the outlet again after it was removed.
ATTENTION
CLEANING
POWER SOURCE
3
Troubleshooting
Safety
Name of parts
Control panel
Maintenance
&cleaning
Set up
Notes concerning
operation
If the supply cord is damaged,it must be replaced by manufacturer,
retailer it s service agent or similar qualified person in order to avoid
a hazard.

4
CUIDADO
Não desmonte, repare, nem reconstrua o frigorífico por conta própria.
Não deixe crianças a brincar próximo ao frigorífico. Quando for se desfazer do
frigorífico, remova a porta para evitar que crianças fiquem presas no interior do
aparelho.
Não coloque produtos inflamáveis perto do frigorífico.
Se ocorrerem fugas de gás, não remova a ficha da tomada nem
ajuste a temperatura. Feche a válvula do gás primeiramente.
Remova a ficha da tomada imediatamente na presença de ruídos,
vapores ou odores anormais provenientes do frigorífico. Além disso,
contacte imediatamente o centro de manutenção.
Não coloque garrafas térmicas, medicamentos ou correntes de metal no
frigorífico.
AVISO
Mantenha as aberturas de ventilação do aparelho ou a estrutura interna
desobstruídas.
Não utilize dispositivos mecânicos ou quaisquer outros meios para acelerar
o processo de descongelação, além dos recomendados pelo fabricante.
Não danifique o circuito de refrigeração.
Não utilize aparelhos eléctricos no interior do dos compartimentos de
armazenamento de alimentos, a não ser os do tipo recomendado pelo
fabricante.
INFORMAÇÕES ADICIONAIS
Instruções para substituição da lâmpada de iluminação
Quando for necessário substituir a lâmpada, desligue primeiramente o
refrigerador de vinho e, em seguida, remova os dois parafusos de fixação
da tampa da lâmpada. Em seguida, remova a tampa, puxe a lâmpada e
coloque a nova, fixando a respectiva tampa com os parafusos.
Finalmente, ligue novamente o refrigerador de vinho.
A potência nominal máxima da lâmpada é de 7W.
A substituição deverá ser realizada pelo fabricante, agente de serviço ou
outra pessoa qualificada.
Segurança
Nomes das peças
Observações acerca
da utilização
Painel de controlo
Manutenção e
limpeza
Instalação
Resolução de
problemas
Keep ventilation openings,in the appliance enclosure or in the built-in
structure, clear of obstruction.
Do not use mechanical devices or other means to accelerate the defrosting
process,other than those recommended by the manufacturer.
Do not damage the refrigerant circuit.
Do not use electrical appliances inside the food storage compartments of the
appliance ,unless they are of the type recommended by the manufacturer
WARNING
ADDITION
When gas leaking happens, do not remove the plug from the
outlet or adjust the temperature. Please turn off the gas first.
Please remove the plug from the outlet immediately when there are
noises, fumes or abnormal odor in the refrigerator and contact the service
center promptly.
Do not put thermal bottle, medicine or metal chains on the refrigerator.
Do not disassemble, repair and rebuild the refrigerator by yourself.
Do not let children play around the refrigerator. If the refrigerator
is to be discarded, please remove the door in order to prevent
the child from being sealed in it.
Do not put inflammable near the refrigerator.
CAUTION
When the lamp need to be replaced,please power off the wine chiller at first,
then remove the two screws that were used to fix the lamp cover,removing
the lamp cover and then pull the old lamp,replacing a new one,fixing the lamp
cover with screws .
Finally,power on the wine chiller.
Instructions for replacing the illuminating lamps
Troubleshooting
Safety
Name of parts
Control panel
Set up
Maintenance
&cleaning
Notes concerning
operation
Max.rated input of lamp:7W
4

5
5
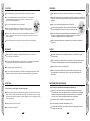
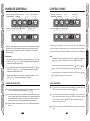
PAINEL DE CONTROLO
Botão para vinho tinto Botão para vinho branco
Botão da luz interna
Indicador de vinho tinto
Indicador normal
normal
Indicador de vinho branco
Depois de ligar a energia, todos os indicadores se acenderão para a inspecção
automática e o frigorífico entrará automaticamente no modo de vinho tinto.
Nesse momento, o indicador de vinho tinto se acenderá e o visor exibirá a
temperatura real.
Observação:
No modo de vinho tinto, a configuração da temperatura será 13°C 55°F
entre 15°C e 12°C ° ° , que é adequada principalmente para o
armazenamento desse tipo de vinho.
|
59 F 54 F
No modo de vinho branco, a configuração da temperatura será 7°C 45°F
entre 9°C e 5°C 48 ° ° , que é adequada principalmente para o
armazenamento desse tipo de vinho.
|
F41 F
No modo personalizado, é possível definir a temperatura entre 4°C e 18°C
40 ° ° , consoante a necessidade do utilizador. F65 F
1. MODO DE VINHO TINTO
1-1. Se premir o botão de vinho tinto quando o frigorífico estiver nesse modo,
o visor mostrará a definição de temperatura 13°C 55°F .
1-2. Se premir o botão para vinho tinto quando o frigorífico não estiver nesse
modo, indicador de vinho tinto se acenderá e o visor mostrará a definição
de temperatura para vinho tinto 13°C 55°F . Além disso, o frigorífico
entrará no modo de funcionamento adequado a esse tipo de vinho.
1-3. Quando libertar o botão para vinho tinto, o visor mostrará a temperatura
do real.
Segurança
Nomes das peças
Observações acerca
da utilização
Painel de controlo
Manutenção e
limpeza
Instalação
Resolução de
problemas
5
CONTROL PANEL
After the power is switched on, all indicators will light up for self-inspection and
then the refrigerator will be automatically set on the red wine mode. At that time,
the red wine indicator will light up and DISPLAY will show the actual temperature.
Note:
In the red wine mode, the temperature setting is 13 55 F |15 ~12
59 F 54 F ), Which is suitable mainly for the storage of red wine.
In the white wine mode, the temperature setting is 7 45 F |9 ~5
48 F 41 F ), which is suitable mainly for the storage of white wine.
In the custom mode, the temperature can be set in the range of 4 ~1
8
40 F
65 F according to user`s requirement.
1-1. If you press the red wine key when the refrigerator is in the red wine mode,
DISPLAY will show the temperature setting 13 55 F .
1-2. If you press the red wine key when the refrigerator is not in the red wine
mode, the red wine indicator will light up, DISPLAY will show the temper
-ature setting of red wine 13 55 F and the refrigerator will start
running in the red wine mode.
1-3. When the red wine key is released, DISPLAY will show the actual temper
-ature.
Custom
Interior light key
White wine indicator
Red wine key
White wine key
Red wine indicator
Custom indicator
1.RED WINE MODE
Troubleshooting
Maintenance
&cleaning
Set up
Notes concerning
operation
Safety
Name of parts
Control panel

6
2. MODO DE VINHO BRANCO
2-1. Se premir o botão para vinho branco quando o frigorífico estiver nesse modo,
o visor mostrará a definição de temperatura 7°C 45°F .
2-2. Se premir o botão para vinho branco quando o frigorífico não estiver nesse
modo de funcionamento, o indicador de vinho branco se acenderá e o visor
exibirá a definição de temperatura para vinho branco 7°C 45°F . Além
disso, o frigorífico entrará no modo de funcionamento adequado a esse tipo
de vinho.
2-3. Quando libertar o botão para vinho branco, o visor mostrará a temperatura
real.
3. MODO PERSONALIZADO
3-1. Se premir o botão “Custom” (Personalizado) quando o frigorífico estiver nesse
modo, o visor mostrará a definição de temperatura.
3-2. Se premir o botão “Custom“ quando o frigorífico não estiver nesse modo,
o indicador de mesmo nome se acenderá e o visor mostrará a temperatura
predefinida pelo utilizador. Além disso, o frigorífico entrará no modo
personalizado.
3-3. Quando libertar o botão “Custom“, o visor mostrará a temperatura real.
4. AJUSTE DA TEMPERATURA
4-1. Deixe o frigorífico a funcionar no modo de definição do utilizador.
4-2. Prima o botão de definição do utilizador durante três segundos e o frigorífico
entrará no modo de ajuste da temperatura. Nesse momento, o LED piscará
e mostrará a definição actual da temperatura.
4-3. Se premir o botão para vinho tinto, a definição de temperatura aumentará 1°C
(1°F)até atingir 18°C(65°F). Depois disso, a definição de temperatura não
mudará mais se premir o botão para vinho tinto novamente. Além disso, se
premir o botão para vinho branco, a definição de temperatura diminuirá 1°C
(1°F)até atingir 4°C(40°F) . Depois disso, a definição de temperatura não
mudará mais se premir o botão para vinho branco novamente.
4-4. O visor mostrará a temperatura real depois de cinco segundos, após a
conclusão do ajuste.
5. LÂMPADA INTERNA
5-1. Se premir o botão da lâmpada interna, esta se apagará quando estiver acesa
e vice versa.
5-2. Quando a lâmpada permanecer acesa continuamente durante uma hora, ela
se apagará automaticamente.
Segurança
Nomes das peças
Observações acerca
da utilização
Painel de controlo
Manutenção e
limpeza
Instalação
Resolução de
problemas
3-1. If you press the custom key when the refrigerator is in the custom mode,
DISPLAY will show the temperature setting.
3-3. When the custom key is released, DISPLAY will show the actual tempera
-ture.
4-1. Please let the refrigerator run in the user setting mode.
4-2. Press the user setting key for 3 seconds and the refrigerator will enter into
the sate for adjustment of temperature. at that time, led will flash and show
the current temperature setting.
4-3. If you press the red wine key, the temperature setting will be increased by
1 (1 F) until it becomes 18 65 F . After that, the temperature setting
will no longer change if you press the red wine key again. alternately, if
you press the white wine key, the temperature setting will be decreased by
1 1 F until it becomes 4 40 F . After that, the temperature
setting will no longer change if you press the white wine key again.
4-4 DISPLAY will show the actual temperature after 5 seconds with the comp
-letion of adjustment.
4. ADJUSTMENT OF TEMPERATURE
3.CUSTOM MODE
5-1 If you press the internal lamp key, the internal lamp will go out when it is lit,
and vice versa.
5-2 When the internal lamp is continuously lit for1 hour, it will go out
automatically.
5. INTERNAL LAMP
2-2. If you press the white wine key when the refrigerator is not in the white wine
mode, the white wine indicator will light up, DISPLAY will show the tempera
-ture setting of white wine 7 45 F and the refrigerator will start running
in the white wine mode.
2-3. When the white wine key is released, DISPLAY will show the actual temper
-ature.
Troubleshooting
Set up
Maintenance
&cleaning
Notes concerning
operation
Safety
Name of parts
Control panel
6
2-1. If you press the white wine key when the refrigerator is in the white wine
mode, DISPLAY will show the temperature setting 7 45 F .
2.WHITE WINE MODE
3-2. If you press the custom key when the refrigerator is not in the custom mode,
the custom indicator will light up, DISPLAY will show the tempera ture preset
by the user and the refrigerator will start running in the custom mode.

7
6. MODO DE REINICIALIZAÇÃO
7. MODO TECLADO BLOQUEADO
6-1. Se premir o botão para vinho branco e o botão para vinho tinto
simultaneamente, todos os indicadores apagarão.
6-2. Após três segundos, todas as definições retornarão aos valores de fábrica.
7-1. Prima o botão para vinho branco e o botão da lâmpada interna
simultaneamente durante três segundos.
7-2. O frigorífico funcionará no modo de teclado bloqueado, se não estiver
nesse modo antes de premir as teclas. Do contrário, o frigorífico sairá
do modo de teclado bloqueado.
7-3. Nesse modo de trabalho, nada ocorrerá e o visor exibirá a mensagem "LO"
se premir algum botão (excepto o botão da lâmpada interna). Quando liberar
o teclado, o visor mostrará a temperatura real.
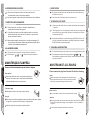
MANUTENÇÃO E LIMPEZA
Remova a ficha da tomada antes de iniciar a limpeza.
Parte interna
Remova as prateleiras, lave-as com spray de esterilização e
seque-as com um pano limpo. Limpe a porta cuidadosamente
utilizando detergente neutro e um pano macio.
Colector de água
Deite água no colector e recoloque-o após a limpeza.
Atenção
Deve-se remover a ficha da tomada e deixar a porta aberta ao efectuar a limpeza
do frigorífico, ou quando não for utilizado por longos períodos.
Não limpe o frigorífico com água ou produtos químicos.
Segurança
Nomes das peças
Observações acerca
da utilização
Painel de controlo
Manutenção e
limpeza
Instalação
Resolução de
problemas
8-1. Em caso de avaria do aparelho, contacte um t cnico qualificado.é
8. ALARME DE AVARIA
8-2. As mensagens " "," " ou " " indicam uma avaria do aparelho.
7
Pour out the water in the collector and replace it after cleaning.
The plug should be removed from the outlet and the door should be opened
when you are doing the cleaning or the refrigerator is not to be used for a
long time.
Do not clean the refrigerator with water or chemicals.
MAINTENANCE & CLEANING
Inside
Water collector
Attention
Troubleshooting
Set up
Control panel
Maintenance
&cleaning
Notes concerning
operation
Safety
Name of parts
6-1 If you press the white wine key and the red wine key simultaneously,
all indicators will go out.
6-2 After 3 seconds, all settings will become ex-factory ones.
7-1. Please press the white wine key and the internal lamp key together for
3 seconds.
7-2. The refrigerator will run in the keyboard lock mode if it was not running in that
mode before the keys are pressed. Otherwise, the refrigerator will exit from
the keyboard lock mode.
7-3.In the keyboard lock mode, no action will happen and DIAPLAY will show "LO"
if any key is pressed (internal lamp key excluded). When the key is released,
DISPLAY will show the actual temperature.
6. RESET MODE
7. KEYBOARD LOCK MODE
8. FAILURE ALARM FUNCTION
8-1.To call professional personnel for repair in case of following problems occured.
8-2.The temperature indication flickeringly displays as " ", " " or " ",
it shows that the refrigerator works in trouble; please do not use Wine cellar
until repair is finished.
Please take out the racks, wash them with sterilization spray
and dry them with a clean cloth. The door should be cleaned
carefully by using neutral detergent and a soft cloth.
Please remove the plug from the outlet first before cleaning.

8
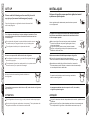
INSTALAÇÃO
Coloque o frigorífico numa superfície rígida, horizontal
e plana com o pé de ajuste.
Leia a seguinte secção atentamente para evitar danos pessoais
ou ao equipamento.
O frigorífico deve ser posto num local com ventilação adequada.
Deverá haver uma distância de mais de 5cm nas laterais e mais
de 10cm na parte superior.
Não coloque o frigorífico num local que receba solar directa
ou próximo a fontes de calor (como fogões a gás e fornos)
ou em locais húmidos.
O frigorífico deve ser posto num local próximo à tomada.
Coloque o refrigerador de vinho próximo à parede e com uma
distância de menos de 75mm.
10cm acima
5cm acima
5cm acima
Utilize uma tomada de 220~240V separada para o frigorífico.
O frigorífico deve estar ligado à terra adequadamente.
Não o aterre através de linhas de telefone ou da tubagem de gás.
Para efectuar a substituição do fio de alta tensão, é necessário
ter ferramentas especiais. Portanto, contacte o centro de manutenção
se esse dispositivo estiver danificado.
O aparelho emitirá ruídos quando houver algo nas laterais,
atrás ou sobre o frigorífico.
A temperatura ambiente deverá ser superior a 5°C, do contrário,
o frigorífico poderá congelar.
ATENÇÃO
O frigorífico deverá ser aterrado adequadamente, do contrário, poderão ocorrer
incidentes.
Não coloque o frigorífico voltado de cabeça para baixo ou transversalmente.
A inclinação entre o frigorífico e o chão nunca deverá ser maior que 45°.
Segurança
Nomes das peças
Observações acerca
da utilização
Painel de controlo
Manutenção e
limpeza
Instalação
Resolução de
problemas
Please use a separate 220~240V outlet for the refrigerator.
Place the refrigerator on a rigid and horizontal surface and flat it
with the adjusting foot.
SET UP
Please read the following section carefully to avoid
any injury of personnel and damage of property.
The refrigerator should be put in a place with good ventilation. There
should be a distance of over 5cm to both sides and the rear and over
10cm to the top.
Do not place the refrigerator in a place with direct sunshine or near
the heat source (such as gas stove and oven) or in a damp place.
The refrigerator should be put in a place near the outlet.
The refrigerator should be nicely grounded. Do not ground it through
phone line or gas pipe.
The replacement of power line needs special tools, so please contact
the service center if your power line is damaged.
The ambient temperature should be over 5 , otherwise the refrigerator
may freeze up.
Noises will arise when something is beside, behind or on
the refrigerator.
ATTENTION
The refrigerator must be correctly grounded, otherwise incident may happen.
Do not put the refrigerator upside down or transversely. The slope between the
refrigerator and the floor should never be more than 45 .
8
Troubleshooting
Maintenance
&cleaning
Control panel
Set up
Notes concerning
operation
Safety
Name of parts

9
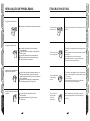
RESOLUÇÃO DE PROBLEMAS
O frigorífico não funciona.
A ficha não foi inserida na tomada correctamente.
O frigorífico emite ruídos.
O conteúdo do frigorífico não foi disposto
adequadamente.
O frigorífico não foi colocado numa superfície
plana e rígida.
O frigorífico está muito próximo da parede.
Há algo caído atrás ou debaixo do aparelho.
O ruído provém do compressor.
A parte frontal e as laterais do
frigorífico estão quentes.
A estrutura do aparelho está equipada com um
tubo anticondensação, portanto o frigorífico
ficará quente quando estiver em funcionamento.
Não é uma avaria.
Há dispositivos de radiação (condensadores)
dentro das duas laterais do frigorífico.
Há gelo na parede interna do
frigorífico.
É normal quando o frigorífico está em
funcionamento.
Desaparecerá quando o frigorífico parar
de funcionar.
Segurança
Nomes das peças
Observações acerca
da utilização
Painel de controlo
Manutenção e
limpeza
Instalação
Resolução de
problemas
Set up
Maintenance
&cleaning
TROUBLESHOOTING
The plug has not been nicely inserted into the
outlet.
The things in the refrigerator have not been evenly
placed.
The refrigerator has not been placed on a rigid and
flat surface.
The refrigerator is too close to the wall.
Something is behind or under the refrigerator.
The sound is from the compressor.
The frame is equipped with anti-condensation
pipe, so the refrigerator will become hot when
it is running.
It is not a fault.
There are radiating devices (condensers)
inside both sides of refrigerator.
The refrigerator
doesn't work.
There are noises
in the refrigerator.
The front and sides
of refrigerator
are hot.
There is frost on
the back wall
inside the
refrigerator.
9
Troubleshooting
Control panel
Notes concerning
operation
Safety
Name of parts
It's normal when the refrigerator is running.
It will disappear when the refrigerator stops
working.

10
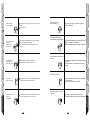
Pode-se ouvir o som
de água vazando.
É o som originado do fluxo de refrigeração.
Não é uma avaria.
O frigorífico está a funcionar
continuamente, sem interrupção.
A temperatura ambiente é muito elevada no verão.
A porta é aberta com frequência.
Não há ventilação suficiente ao redor do frigorífico.
Há condensação na porta e na
estrutura.
A humidade do ambiente está consideravelmente
elevada.
Pode-se remover a condensação com um pano
macio.
É difícil abrir a porta.
Abra a porta somente depois de 5 a 10 segundos
de a ter fechado.
A dificuldade origina-se da pressão.
Ouvem-se chiados vindos do
frigorífico.
Os chiados originam-se da contracção ou
expansão de partes internas. Não é uma avaria.
Segurança
Nomes das peças
Observações acerca
da utilização
Painel de controlo
Manutenção e
limpeza
Instalação
Resolução de
problemas
Set up
It is the sound arising from the flowing of refrig
-erant.
It is not a fault.
The ambient temperature is too high in summer.
The door is opened frequently.
The ventilation around the refrigerator is not
enough.
The ambient humidity is quite high.
It can be removed with a soft cloth.
Water-flowing
sound is heard.
The refrigerator is
running
continuously
without stop.
Condensation is
found on the
door and frame.
The door is
difficult to open.
Creaks are coming
from the
refrigerator.
Open the door 5~10 seconds after it was closed.
The difficulty comes from pressure.
The creaks arise from the contraction or expan
-sion of internal parts. It is not a fault.
10
Troubleshooting
Maintenance
&cleaning
Control panel
Notes concerning
operation
Safety
Name of parts

Contact SAMSUNG WORLD WIDE
If you have any questions or comments relating to Samsung products, please contact
the SAMSUNG customer care centre.
Contacte SAMSUNG GLOBAL
Se tem algumas d vidas ou coment rios sobre os produtos Samsung, contacte por
favor a nossa linha de apoio a clientes Samsung.
úá
SOUTH AFRICA
0860 7267864 (SAMSUNG) www.samsung.com/za
SOUTH AFRICA
0860 7267864 (SAMSUNG) www.samsung.com/za
-
 1
1
-
 2
2
-
 3
3
-
 4
4
-
 5
5
-
 6
6
-
 7
7
-
 8
8
-
 9
9
-
 10
10
-
 11
11
-
 12
12


Samsung RW13EBSS Manual do usuário
- Categoria
- Refrigeradores de vinho
- Tipo
- Manual do usuário
em outras línguas
- English: Samsung RW13EBSS User manual